FZRSDR ver 2.9.9

FZR SDR
Skimmer CW e ricevitore SDR per pile-up, contest, VHF/UHF e QO-100 · Perseus, RTL-SDR, ADALM-Pluto, SpyServer, ExtIO, scheda audio · IW1FZR Amateur Radio Tools
📚 Indice Rapido Documentazione FZR SDR
📖 Manuale Utente FZR SDR
FZR SDR è uno skimmer CW e un ricevitore SDR per i pile-up in split, i contest e l’ascolto di tutti i giorni, dalle onde corte alle microonde. Funziona con il Perseus, le chiavette RTL-SDR, l’ADALM-Pluto, i ricevitori con plugin ExtIO (SDRplay, Airspy HF+…), gli SpyServer e i KiwiSDR in rete e qualsiasi radio tramite la scheda audio; con un LNB anche QO-100.
Il waterfall scorre libero su tutta la banda ricevuta, con lo spettro accanto. Nei modi Skimmer accanto a ogni segnale compare il testo CW decodificato, con nominativi e 5NN evidenziati; in DXpedition l’audio resta fermo sul DX e dopo ogni suo rapporto il programma segna dove ha risposto la stazione lavorata, cioè dove il DX sta ascoltando. Nei modi Ricevitore (CW, SSB, RTTY con lo skimmer FZRTTY, DIGI, FM e AM) ci sono due VFO in stereo, VFO A sul DX e VFO B per trovare chi risponde, con S-meter, NB, NR e NOTCH, un banco di memorie e il comando della radio via CAT.
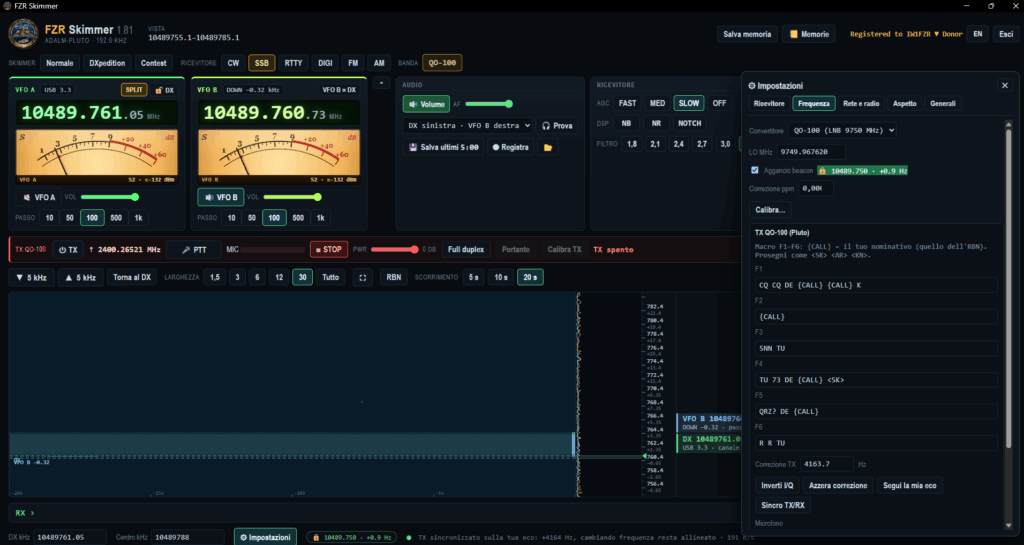
[Immagine: schermata principale di FZR SDR]
🚀 Per iniziare
🎛️ Uso
🧰 Cosa serve
- PC con Windows 10 o 11 (FZR SDR è a 32 bit, gira anche sui Windows a 64 bit).
- Microsoft Edge (c’è già in Windows) oppure Google Chrome: servono solo a disegnare la finestra.
- Un ricevitore: Perseus (il modo migliore), oppure una radio collegata alla scheda audio, oppure un ricevitore IQ (SoftRock e simili), oppure un ricevitore con plugin ExtIO per HDSDR (SDRplay RSP, Airspy HF+ e altri), oppure una chiavetta RTL-SDR per VHF/UHF (vedi Chiavetta RTL-SDR).
- Per il Perseus: i file
perseususb.dlleperseus*.sbs, che ha già chi usa CW Skimmer o il software del Perseus (prepara_cartella.bat li copia da lì). Altrimenti sono tutti nel pacchetto ufficiale ExtIO Perseus 2.4a (Microtelecom); il driver USB del Perseus è nel pacchetto driver Perseus 2026a1. Per aiuto: gruppo utenti Perseus. - Facoltativo: un collegamento Internet per il Reverse Beacon Network.
⬇️ Download: file e programmi aggiuntivi
Oltre a FZR SDR servono, a seconda del ricevitore e delle funzioni, alcuni file che non si possono distribuire con il programma. Tutti i link portano ai siti ufficiali.
| Cosa | Serve per | Dove |
|---|---|---|
| Driver USB del Perseus | Perseus, se Windows non lo riconosce (senza CW Skimmer né software Perseus) | Microtelecom · PerseusDriversUpdate |
| perseususb.dll e file .sbs | Perseus (il setup li copia da CW Skimmer o dal software Perseus, se ci sono) | Microtelecom · ExtIO_perseus |
| CW Skimmer | facoltativo: chi lo ha già ha anche i file del Perseus | dxatlas.com/CwSkimmer |
| Zadig (driver WinUSB) | chiavetta RTL-SDR: si installa una volta, come per SDR# | zadig.akeo.ie |
| Driver PlutoSDR (Analog Devices) | ADALM-Pluto collegato con la USB | wiki.analog.com · Pluto drivers |
| rtl_tcp e driver RTL-SDR Blog | chiavetta RTL-SDR (già nella cartella rtl del programma; da qui se manca) | github.com/rtlsdrblog/rtl-sdr-blog |
| Microsoft Visual C++ Redistributable | solo se rtl_tcp.exe non parte (manca VCRUNTIME o MSVCP) | Microsoft · VC++ Redistributable |
| Hamlib (rigctld) | comando della radio (CAT): la versione più recente per Windows | github.com/Hamlib/Hamlib |
| SDRplay API e plugin ExtIO | ricevitori SDRplay RSP (ExtIO) | sdrplay.com · Windows |
| Plugin ExtIO Airspy HF+ | Airspy HF+ e Discovery (ExtIO) | airspy.com/download |
| HDSDR | facoltativo: i plugin ExtIO sono gli stessi | hdsdr.de |
| MASTER.SCP | elenco dei nominativi da contest (Super Check Partial): va nella cartella del programma | supercheckpartial.com |
| Elenco ponti di IK2ANE | ripetitori italiani da importare nel banco di memorie (file pontixls.xls) | ik2ane.it |
| VB-Cable | cavo audio virtuale: audio di FZR SDR verso WSJT-X o altri programmi | vb-audio.com/Cable |
| WSJT-X | decodifica FT8/FT4 con l’audio del modo DIGI | wsjtx.sourceforge.io |
💾 Installazione
Con l’installazione (consigliato)
- Scarica FZRSDR_Setup e avvia
FZRSDR_Setup_2.9.2.exe. Non servono permessi di amministratore: il programma va in%LOCALAPPDATA%\Programs\FZR SDR(se scegli «per tutti gli utenti» va in Program Files e allora impostazioni, registro e licenza stanno in%APPDATA%\FZRSDR). - Il setup copia da solo
perseususb.dlle i file.sbsdel Perseus da CW Skimmer, dal software Perseus o da HDSDR, e l’elenco nominativi (MASTER.SCP di N1MM o MASTER.DTA di CW Skimmer). Se il software del Perseus lo installi dopo: menu Start → FZR SDR → Copia i file del Perseus. - Mette l’icona sul desktop e nel menu Start; si disinstalla da Impostazioni → App.
- Dov’è la cartella: è nascosta in AppData. Premi Win+R, scrivi
%LOCALAPPDATA%\Programs\FZR SDRe Invio: lì ci sonofzrsdr.json,fzrsdr.log, la cartellartle le registrazioni. Oppure menu Start → tasto destro su FZR SDR → Apri percorso file. Se hai installato «per tutti gli utenti», il programma è inC:\Program Files\FZR SDRe impostazioni, log e registrazioni in%APPDATA%\FZRSDR. - Per aggiornare basta avviare il setup nuovo: chiude FZR SDR e non tocca impostazioni, memorie, licenza e registrazioni.
- Chi aveva FZR Skimmer: il setup aggiorna l’installazione vecchia nella sua cartella, che resta
Programs\FZR Skimmer(lì ci sono licenza e impostazioni), e cancellaFZRSkimmer.exee le icone «FZR Skimmer». Avvia sempre FZR SDR: in alto, accanto al nome, c’è la versione. Se il log dice «FZR Skimmer 1.83» stai usando ancora l’exe vecchio: cancellalo e rifai il setup (non copiare a mano solo l’exe nuovo). - Chi usava lo zip: per tenere impostazioni e memorie copia
fzrsdr.jsondalla vecchia cartella in quella nuova, a programma chiuso. - Windows può mostrare l’avviso SmartScreen (programma non firmato): Ulteriori informazioni → Esegui comunque.
Con lo zip
- Scarica lo zip FZRSDR e scompattalo dove vuoi, per esempio in
C:\FZRSDR. - Senza CW Skimmer né software Perseus: installa il driver USB dal pacchetto driver di Microtelecom (se il Perseus non è già riconosciuto da Windows), poi scarica il pacchetto ExtIO Perseus 2.4a e copia
perseususb.dlle tutti i fileperseus*.sbsnella cartella di FZR SDR, accanto a FZRSDR.exe. Il passo successivo allora non serve. - Avvia una volta prepara_cartella.bat: copia nella cartella i file del Perseus prendendoli da CW Skimmer, HDSDR o dal software Perseus, e l’elenco nominativi
MASTER.SCPda N1MM se c’è. Se non lo fai, FZR SDR cerca comunque quei file nelle cartelle di CW Skimmer. - Chiudi CW Skimmer, HDSDR e il software del Perseus: il Perseus lo può usare un solo programma per volta.
- Avvia FZRSDR.exe: si apre la finestra del programma.
Tutte le impostazioni (banda, DX, memorie, filtro, sensibilità, colori, ricevitore, modo) si salvano da sole nel file fzrsdr.json accanto all’exe. Il diario del programma è fzrsdr.log, nella stessa cartella: è il primo file da guardare se qualcosa non va.
🔑 Registrazione e prova gratuita
FZR SDR usa la stessa registrazione di ADIF FZR: stesso nominativo, stessa chiave. Se ADIF FZR è già registrato sullo stesso PC, FZR SDR trova la licenza da solo e non chiede nulla.
- Senza registrazione il ricevitore funziona 30 minuti per ogni avvio, poi si ferma e compare la finestra di registrazione.
- La riproduzione delle registrazioni è sempre libera.
- Pulsante Registra in alto: scrivi il nominativo e incolla la chiave che hai ricevuto. Non c’è attivazione automatica: la chiave va sempre incollata, anche se è la stessa di ADIF FZR.
- Richiedi una chiave apre la pagina di richiesta su iw1fzr.it; oppure compila il modulo qui sotto. La registrazione è gratuita e la stessa chiave vale per ADIF FZR.
🔑 Richiedi la chiave di registrazione
La registrazione è gratuita e una sola chiave vale per ADIF FZR e per FZR Skimmer. Senza chiave ADIF FZR funziona 30 giorni di prova, FZR Skimmer 5 minuti per ogni avvio. I Donor hanno il ♥ accanto al call. Compila e invia: riceverai la chiave via email.
📻 Ricevitori
Il ricevitore si sceglie in ⚙ Impostazioni → Ricevitore, senza riavviare il programma.
| Ricevitore | Quando usarlo | Cosa impostare |
|---|---|---|
| Perseus | Il modo migliore: vedi e decodifichi fino a 96 kHz di banda (48 kHz bastano per quasi tutti i pile-up). | Centro Perseus kHz, Campionamento. Se le stazioni appaiono specchiate, spunta Inverti I/Q. |
| Audio della radio | Qualsiasi radio: l’uscita audio entra nella scheda audio del PC (per esempio USB Audio CODEC dell’IC-7600). Vedi solo la banda passante della radio, 2–3 kHz. | Ingresso, Frequenza radio kHz (quella che mostra la radio), Offset: la nota CW, es. 600, se la radio mostra la frequenza del segnale come gli Icom in CW; 0 se mostra la portante. |
| IQ da scheda audio | Ricevitori che mandano I e Q sui canali sinistro e destro (SoftRock e simili). | Ingresso, LO kHz (frequenza centrale), Campionamento. |
| ExtIO (SDRplay, Airspy HF+…) sperimentale | Qualsiasi ricevitore che abbia un plugin ExtIO a 32 bit per HDSDR: SDRplay RSP1A/RSPdx/RSPduo, Airspy HF+ / Discovery, FunCube e altri. Se il ricevitore funziona in HDSDR, funziona anche qui. Serve il driver del ricevitore installato (per SDRplay la SDRplay API). | Plugin: il programma lo cerca nelle cartelle di HDSDR, SDRplay e Airspy e nella sua; altrimenti Sfoglia… e scegli il file ExtIO_….dll. Campionamento: l’elenco viene dal plugin, scegli 192 kHz o meno; se il ricevitore dà solo velocità alte (SDRplay a 2 MHz) il programma le riduce da solo sotto i 200 kHz (÷ n accanto al valore). Impostazioni ricevitore apre la finestra del plugin (guadagno, antenna, AGC). Centro kHz. |
| RTL-SDR (chiavetta) | VHF/UHF (24 MHz – 1,7 GHz), FM e AM; con il direct sampling anche le onde corte. Anche senza Perseus. | Driver WinUSB (Zadig). Vedi Chiavetta RTL-SDR. |
| ADALM-Pluto | VHF/UHF/SHF via USB o in rete (con il firmware sbloccato da 46,9 MHz a 6 GHz); QO-100 con LNB. | Driver PlutoSDR per la USB. Vedi ADALM-Pluto. |
| SpyServer (in rete) | Airspy HF+, Airspy R2/Mini o chiavetta RTL-SDR di qualcun altro, via Internet. | Solo l’indirizzo. Vedi SpyServer. |
| KiwiSDR (in rete) | Un KiwiSDR (0–30 MHz) di qualcun altro, via Internet: una fetta di ±5 kHz. | Solo l’indirizzo. Vedi KiwiSDR. |
| Registrazione (WAV) | Riascoltare una registrazione IQ. | Vedi Registrare e riascoltare. |
Se il ricevitore non parte, premi Riavvia ricevitore: chiude e riapre il Perseus senza chiudere il programma (un paio di secondi di silenzio; le impostazioni restano). Il programma riprova già da solo 3 volte all’avvio.
↑ Torna all’indice principale🎛️ Radio (CAT) con Hamlib
FZR SDR comanda la radio (IC-7600 e tutte le radio supportate da Hamlib) in parallelo al Perseus: la radio e il waterfall si seguono a vicenda. Lo fa tramite rigctld, il programmino di Hamlib che usano anche WSJT-X e molti logger.
- Installa Hamlib per Windows dalla pagina ufficiale (file
hamlib-w32-….exeo-w64, va bene l’uno o l’altro). FZR SDR trovarigctld.exeda solo nelle cartelle di Hamlib, WSJT-X e JTDX; altrimenti Sfoglia…. - In ⚙ Impostazioni → Rete e radio premi Radio…: scegli il modello (scrivi «7600» per trovare 3063 · Icom IC-7600), la porta COM e la velocità (IC-7600: CI-V via USB, 19200), poi Collega la radio.
- Se un altro programma ha già aperto rigctld, scegli Collegati a un rigctld già aperto e indica computer e porta (di solito 4532): così la radio la usate in due.
- La spunta Radio (CAT) (in ⚙ Impostazioni → Rete e radio) accende e spegne il collegamento; accanto c’è la frequenza letta dalla radio, il modo e il TX in split.
| Cosa fa | Come |
|---|---|
| La radio segue FZR SDR | DX (Ctrl+clic, rotellina, frequenza scritta), pulsanti di banda, modo: CW, oppure USB/LSB in SSB. |
| FZR SDR segue la radio | Giri la manopola: il DX (o l’RX) si sposta; se esci dalla banda ricevuta il Perseus si risintonizza. Con Audio della radio la frequenza si legge da sola, niente più a mano. |
| Split in SSB | Il TX della radio segue VFO B: giri la rotellina, trovi chi risponde, e il TX è già lì. Pulsante TX = VFO B o tasto T. |
| Split in DXpedition | TX → ascolto o tasto T: TX sull’ultimo ascolto rilevato. |
| Split dove vuoi | Tasto destro sul waterfall → TX qui (split). |
| Sul waterfall | La linea rossa tratteggiata è il TX della radio, con lo scostamento dal DX. |
| Quando trasmetti | L’audio del tuo segnale tace e la ricezione riparte appena smetti, in circa 20 ms: niente sordità dopo il TX in isofrequenza. Lo capisce dal PTT della radio (letto 10 volte al secondo) e, anche senza CAT, dal tuo segnale che satura la banda; durante il TX l’AGC resta fermo al livello di prima. |
🎯 Calibrazione della frequenza
Se il ricevitore legge un po’ spostato rispetto alla frequenza vera (il Perseus a volte di qualche decina di Hz), si corregge con Correzione ppm, in ⚙ Impostazioni → Frequenza. L’errore viene dal quarzo del ricevitore ed è proporzionale alla frequenza: per questo si scrive in ppm (parti per milione) e una sola correzione vale per tutte le bande. 1 ppm sono 7 Hz a 7 MHz, 14 Hz a 14 MHz, 28 Hz a 28 MHz.
Il modo comodo è il pulsante Calibra…, che fa un test su una stazione campione:
- Scegli una stazione che in quel momento senti bene: RWM 4996 / 9996 / 14996 kHz, WWV e BPM 5 / 10 / 15 MHz, CHU 3330 / 7850 / 14670 kHz. Dall’Italia di solito vanno bene RWM e le portanti a 10 o 15 MHz.
- Premi Misura: il programma si sintonizza sulla stazione (la portante finisce nell’audio DX, la senti), la misura per 6 secondi con la precisione di un centesimo di Hz e torna dov’eri, con lo stesso DX.
- Compaiono l’errore attuale in Hz, la forza del segnale, la stabilità e la correzione misurata in ppm.
- Se va bene premi Applica la correzione. Non viene applicata da sola: decidi tu.
- Per controllo, misura una seconda stazione su un’altra frequenza: deve dire «Il ricevitore è già preciso».
| Messaggio | Cosa fare |
|---|---|
| Segnale troppo debole | Prova un’altra stazione o un’altra frequenza della stessa (cambia con l’ora del giorno). |
| Misura instabile | Riprova: fading forte o due stazioni sulla stessa frequenza (WWV e BPM sono entrambe su 5, 10, 15 MHz). |
Con un segnale di cui sai la frequenza (chiavetta RTL-SDR)
La chiavetta in VHF/UHF non riceve le stazioni campione. Nella finestra Calibra…, sotto l’elenco, scrivi la frequenza esatta di un segnale che conosci e che senti forte: l’uscita di un ponte mentre trasmette (es. 145.6 o 145600) o un beacon. Poi Misura e Applica la correzione, come sopra. Con la chiavetta la ricerca arriva a ±150 ppm e salta il picco fisso che c’è al centro del waterfall.
🖥️ La schermata
[Immagine: la schermata con le parti numerate]
- In alto: zona di banda visibile, ultimo ascolto rilevato, stato della registrazione, pulsante EN/IT per la lingua (italiano o inglese, resta memorizzata) e pulsante Esci.
- Modo (DXpedition / Contest) e Banda: i pulsanti 160…10 (compresi i 60 m) richiamano centro e DX memorizzati per quella banda; Salva memoria memorizza quelli attuali.
- Pannello radio: VFO A (e VFO B) con frequenza, S-meter, mute e volume, poi Audio e Ricevitore (AGC, filtro…): vedi sotto.
- Comandi del waterfall (colori, luce e contrasto ora sono in ⚙ Impostazioni → Aspetto): ▲/▼ 5 kHz, Torna al DX, Larghezza della vista (da 1,5 kHz a tutta la banda), Sensibilità, Colori/Luce/Contrasto, Scorrimento (5, 10 o 20 secondi di storia).
- Waterfall a sinistra: il tempo scorre da sinistra verso destra (a destra i segnali appena arrivati), la frequenza è in verticale con la scala a destra. La fascia verde è la banda passante dell’RX sul DX.
- Testo decodificato a destra, all’altezza di ogni segnale. 5NN/599/TU su fondo arancio; nominativi sicuri in bianco su fondo blu; nominativi corretti dal programma con il ?, sottolineati a tratti.
- Riga DX sotto il waterfall: tutto quello che trasmette il DX, di seguito.
- In basso: DX kHz, Zona UP, Centro kHz, il pulsante ⚙ Impostazioni e la riga di stato con le «pillole» 📡 RBN, 🎛️ radio e 🔒 aggancio beacon (verdi se va, gialle se c’è un problema).
Pannello ⚙ Impostazioni
Le impostazioni che si toccano poco stanno in un pannello a destra, a schede; si apre con ⚙ Impostazioni in basso, si chiude con Esc o ✕ e ricorda l’ultima scheda aperta.
- Ricevitore: quale ricevitore (Perseus, audio della radio, IQ, ExtIO, chiavetta RTL-SDR, ADALM-Pluto, SpyServer, KiwiSDR) e le sue impostazioni, Riavvia ricevitore.
- Frequenza: convertitore e LO, aggancio beacon, correzione ppm, Calibra….
- Rete e radio: RBN con il nominativo, Radio (CAT), Radio….
- Aspetto: colori del waterfall, luce e contrasto, colore del display; Lancetta (S-meter a lancetta, stile ambra), ☀️ Chiaro (tema chiaro per il giorno: waterfall e display restano scuri), Piano (piano di banda sulla scala), 📌 Memorie (memorie sul waterfall), Spettro.
- Generali: «Cambio modo → memoria del modo» e quanti minuti tenere per «Salva ultimi».
Spettro, piano di banda e memorie sul waterfall
- Spettro: la striscia fra waterfall e scala mostra il livello dei segnali in questo momento (azzurro) e i picchi degli ultimi secondi (oro), con le righe di VFO A e VFO B.
- Piano di banda: la striscia colorata sul bordo della scala (IARU Regione 1, indicativo): viola CW, arancio digitali, verde fonia, rosso beacon, azzurro FM e ripetitori, ciano satelliti; anche la fetta di QO-100.
- 📌 Memorie: le memorie del banco che cadono nella vista compaiono come segnalini dorati con il nome; un clic sul segnalino porta su quella memoria.
- Larghezza della vista: ogni modo ricorda la sua; di base FM e AM 30 kHz, SSB e DIGI 6 kHz, CW e RTTY 3 kHz.
- ⛶ accanto alla larghezza: schermo intero (Esc per uscire), comodo su un secondo monitor o sul tablet.
| Sensibilità | Effetto |
|---|---|
| Alta | più nominativi deboli, ma più errori |
| Media | il punto di partenza consigliato |
| Bassa | solo segnali puliti |
Pannello radio
Sotto i modi c’è il pannello «da radio», con un riquadro per ogni ricevitore e i suoi comandi accanto.
- SPLIT (nei modi Ricevitore, tasto S): acceso = VFO B attivo; spento = solo VFO A, come una radio senza split: il riquadro VFO B sparisce, la rotellina e il clic sul waterfall spostano VFO A e, con la radio collegata, lo split della radio si spegne.
- Quando c’è un solo ricevitore acceso (split spento, oppure VFO A o VFO B muto) lo senti in tutte e due le orecchie.
- VFO A (bordo verde): la frequenza grande, il modo e il filtro, lo S-meter, 🔊 VFO A (acceso = si sente, spento = muto, tasto M) e il suo VOL. Rotellina sulla frequenza: sposta il DX del Passo di VFO A (da 10 Hz a 1 kHz, uno per ogni modo Ricevitore: di base 100 Hz in SSB e DIGI, 50 Hz in CW e RTTY; vale anche per Ctrl + rotellina, frecce e rotellina con lo split spento; con Maiusc 10 Hz; il 🔒 DX la blocca). Cifre come tasti: clic sulla metà alta di una cifra = +1 su quella cifra, sulla metà bassa = −1 (su 14.074, sopra lo 0 delle decine di kHz si va a 14.084); passando con il mouse la cifra si illumina e una barretta mostra la metà. Rotellina sopra una cifra: cambia quella cifra. Clic su «MHz» o un numero sulla tastiera (con il VFO selezionato): scrivi la frequenza in kHz (
14195) o in MHz (14.195), Invio conferma, Esc annulla; la frequenza scritta sposta anche il centro. Vale anche per VFO B. - VFO B (bordo azzurro, nei modi Ricevitore): frequenza, scostamento UP/DOWN dal DX, S-meter, 🔊 VFO B (tasto R) e il suo VOL, il Passo della rotellina, VFO B = DX e, con la radio collegata, TX = VFO B. Rotellina e clic sulla frequenza come per VFO A.
- Audio: Volume (accende l’audio nel PC), AF (volume generale), cuffia (DX a sinistra, a destra o insieme), 🎧 Prova e i pulsanti di registrazione (💾 Salva ultimi, ⏺ Registra, 📂).
- Ricevitore: AGC e RF, ATT e PRE, filtro (CW o SSB) e banda laterale.
- Nei modi Skimmer (Normale, DXpedition, Contest) il pannello sta su una riga sola, così il waterfall resta alto. Nei modi Ricevitore il pulsante ▴ lo riduce alle sole due frequenze (▾ lo riapre): i tasti M e R e la rotellina funzionano lo stesso.
- I due VOL (doppio clic = normale) dosano DX e VFO B ognuno per conto suo.
DSP: NB, NR, NOTCH e colori del display
Nel riquadro Ricevitore, riga DSP. NB e NR hanno tre livelli: ogni clic sale di uno (1, 2, 3, poi spento), il tasto destro li spegne.
- NB (noise blanker, tasto B): toglie gli impulsi (scariche, motori, recinti elettrici) prima del filtro, come il noise blanker delle radio. Più alto il livello, più impulsi deboli toglie.
- NR (riduzione del rumore, tasto N): abbassa il fruscio fra le parole e fra i segni CW. Livello 1 leggero, 3 forte (con il 3 la voce diventa un po’ «metallica»). Vale per VFO A e VFO B e anche nei modi Skimmer.
- NOTCH (solo SSB): spegne da solo le portanti fisse (chi accorda, battimenti) che restano più di un secondo.
- NB, NR e NOTCH restano memorizzati. L’NR aggiunge un ritardo fisso di 32 ms, anche spento, uguale per VFO A e VFO B.
- Display (in ⚙ Impostazioni → Aspetto, con Colori, Luce e Contrasto): il colore del pannello radio, cioè frequenze, S-meter e cursori: notte, ambra, verde, blu o rosso.
Comandi da radio: AGC, RF, AF, ATT, PRE, filtro SSB
- AGC: FAST per i pile-up e i segnali che vanno e vengono, MED, SLOW per un ascolto riposante (il predefinito), oppure OFF: guadagno fisso regolato con il cursore RF (abbassalo se i segnali forti distorcono).
- AF: il volume; doppio clic lo riporta al normale.
- ATT 0/10/20/30 dB e PRE (preamplificatore): compaiono solo con il Perseus. Lo S-meter tiene conto dell’attenuatore e continua a leggere il segnale in antenna.
- Filtro SSB da 1,8 a 3,3 kHz (solo in SSB): la banda passante parte sempre da 200 Hz.
S-meter
Nel pannello radio c’è lo S-meter del DX (VFO A); nei modi Ricevitore anche quello di VFO B. Misura il segnale nella banda passante dell’RX, come una radio: S9 = −73 dBm, 6 dB per unità S, poi S9+10 fino a S9+60. La barra sale subito e scende piano; il trattino bianco è il picco degli ultimi 2 secondi.
- A lancetta: in ⚙ Impostazioni → Aspetto il pulsante Lancetta lo trasforma in uno strumento ambra retroilluminato, come le radio classiche, con il puntino rosso del picco e sotto la lettura in S e dBm. La lancetta ha un po’ d’inerzia: sale svelta e scende più piano.
- Finché non è tarato, i dBm hanno il segno ≈ (valore indicativo).
- Con la chiavetta RTL-SDR non tarata il riferimento è il rumore di fondo del canale, che vale circa S3 in VHF (−174 dBm/Hz più la larghezza del filtro e 6 dB di cifra di rumore): il livello dei suoi campioni cambia con il guadagno, quindi un valore fisso darebbe sempre S9++. Per letture vere tarala come gli altri ricevitori.
- Clic sullo S-meter → Imposta: metti il DX su un segnale stabile e scegli quanto vale (es. S9).
- Oppure con la radio (CAT, stessa frequenza del DX, segnale stabile come una portante o un broadcast), in due passi perché col relè d’antenna Perseus e radio non ricevono insieme: 1 · Misura qui con il relè sul Perseus, poi spegni il relè (antenna alla radio) e 2 · Leggi la radio. Con antenne separate o uno splitter premi i due pulsanti uno dopo l’altro.
- La taratura si ricorda per ogni ricevitore (Perseus, ExtIO, scheda audio); Azzera la toglie.
👂 Modo Normale (ascolto libero, skimmer CW)
Il modo per ascoltare la banda come con CW Skimmer. Si sceglie con Normale in alto a sinistra.
- A destra si apre il pannello Testo decodificato: una riga per ogni segnale visibile nel waterfall, dal più alto al più basso, con la frequenza e il testo degli ultimi 3 minuti.
- Evidenziati: nominativi (riquadro; quelli sicuri bianchi su blu, quelli corretti dal programma con il ?), CQ in verde, 599/5NN/TU su fondo arancio.
- Lo stesso evidenziamento vale anche nella colonna accanto al waterfall.
- Clic su una riga: l’RX va su quel segnale (con Volume acceso lo senti).
- Le righe con un solo frammento senza nominativi sono nascoste; quelle ferme da più di un minuto sono attenuate.
- Il pulsante ☰ Elenco mostra o nasconde il pannello. La ricerca dell’ascolto è spenta.
🌍 Modo DXpedition (pile-up in split)
È il modo per cui FZR SDR è nato. Un esempio tipico: il relè della radio commuta in trasmissione, il Perseus riceve; l’audio resta fisso sul DX mentre tu scorri il waterfall per vedere dove chiama il pile-up e dove risponde la stazione lavorata.
- Imposta il DX: Ctrl + clic sul suo segnale nel waterfall, oppure scrivi la frequenza in DX kHz (in kHz, es.
14025,5, o in MHz, es.145,5o7,074; Invio: se è fuori dalla vista il ricevitore si sposta da solo; lo stesso vale per Centro kHz), oppure tasto destro → Imposta il DX qui. Per ritoccarlo: Ctrl + rotellina (50 Hz, con Maiusc 10 Hz) o le frecce sinistra/destra. - Zona UP: dove cercare l’ascolto, in kHz sopra il DX. Se il DX dice “UP 1-5”, scrivi 1 e 5. Serve anche a escludere FT8 e altri segnali digitali.
- Ascolto rilevato: dopo ogni 5NN del DX, il programma guarda chi risponde subito dopo e traccia una linea arancio su quella frequenza, con lo scostamento dal DX. Le ultime frequenze restano come pulsanti in Ascolti: un clic e il waterfall si centra lì.
- Se l’ascolto è fuori dalla vista, compare un pulsante arancio in alto o in basso nel waterfall: cliccalo per andarci.
🏆 Modo Contest (S&P)
Con Modo → Contest si apre l’elenco stazioni e la ricerca dell’ascolto si spegne. L’elenco si apre e chiude anche a mano con ☰ Elenco.
- Le stazioni sono in ordine di frequenza, con nominativo, etichetta CQ se stanno chiamando CQ o TEST, frequenza, dB, velocità e da quanto sono state sentite.
- Ci finiscono i nominativi confermati (decodificati uguali almeno due volte sullo stesso segnale, oppure subito dopo CQ/TEST) e gli spot RBN della banda ricevuta, in viola.
- Clic su una riga: l’audio va su quella stazione e il waterfall si centra lì.
[Immagine: il modo Contest con l’elenco stazioni]
↑ Torna all’indice principale🎙️ Modo SSB (pile-up in fonia)
Per i pile-up feroci in fonia. Il primo ricevitore resta fermo sul DX; un secondo ricevitore, VFO B, si sposta velocissimo con la rotellina per trovare chi sta rispondendo. Si sceglie con SSB in alto a sinistra.
- Audio in stereo: DX in un orecchio e VFO B nell’altro (menu DX sinistra · VFO B destra, il contrario, oppure insieme). Ognuno ha il suo VOL nel pannello radio, accanto al suo mute (doppio clic = normale).
- Rotellina sul waterfall: VFO B sale o scende del Passo scelto, 100, 500 o 1000 Hz, agganciato alla griglia (14200.0, 14200.5…). Maiusc + rotellina scorre la vista, Ctrl + rotellina sposta il DX.
- Clic su una voce nel waterfall: VFO B va lì, con la banda passante centrata dove clicchi. Ctrl + clic fa lo stesso con il DX. VFO B = DX riporta VFO B sul DX.
- Banda laterale Auto (LSB sotto i 10 MHz, USB sopra e sui 60 m, come d’uso) oppure fissa; filtro 2,7 kHz (200–2900 Hz) con fianchi ripidi, per non sentire i vicini.
- Sul waterfall: banda passante del DX in verde, di VFO B in azzurro con lo scostamento (es. VFO B +5.30); nella colonna a destra le due frequenze e il passo.
- La frequenza del DX e di VFO B è quella della portante, come sulla radio. Lo scostamento di VFO B è memorizzato rispetto al DX: cambiando banda resta, per esempio, UP 5.
- Memorie di banda per la fonia: passando in SSB il ricevitore va sul segmento fonia della stessa banda (40 m: centro 7150, DX 7140; 20 m: 14220 / 14195; 80 m: 3780 / 3790…), tornando in CW riprende le memorie CW. Salva memoria in SSB salva quella fonia. Il 30 m in SSB non compare.
- Ctrl + rotellina e Ctrl + clic spostano solo il DX: VFO B resta dov’è e cambia lo scostamento. Cambiando banda, invece, VFO B tiene lo scostamento (es. UP 5).
- 🔊 VFO A DX (tasto M) e 🔊 VFO B (tasto R) funzionano allo stesso modo: acceso (illuminato) = si sente, spento (🔇) = muto. VFO B spento sparisce anche dal waterfall e si riaccende appena giri la rotellina.
- 🔒 DX (spento di base): se lo accendi, Ctrl + rotellina e frecce non spostano il DX per sbaglio; Ctrl + clic, tasto destro, frequenza scritta e pulsanti di banda sì.
- 🎧 Prova: una nota bassa nell’orecchio del DX e una alta in quello di VFO B. Se le senti tutte e due uguali, il problema è fuori dal programma: cuffia mono, scheda audio, mixer, oppure Windows con Audio mono acceso (Impostazioni → Accessibilità → Audio).
📟 Ricevitore: CW, RTTY, DIGI
Oltre all’SSB, la riga Ricevitore ha CW, RTTY e DIGI: un ricevitore puro (in RTTY con lo skimmer FZRTTY, vedi sotto), con tutto quello dell’SSB (VFO A sul DX, VFO B con la rotellina, stereo, 🔊 VFO A / 🔊 VFO B, split che segue VFO B, S-meter) e memorie di banda proprie.
| Modo | Frequenza | Banda passante | Memorie |
|---|---|---|---|
| CW | quella del segnale, sentito a 600 Hz | Filtro RX 100–800 Hz | le stesse dello skimmer CW |
| SSB | portante (come la radio) | 2,7 kHz, USB o LSB | fonia: 7140, 14195… |
| RTTY (skimmer FZRTTY a scelta; TX su QO-100) | mark (come gli Icom), shift 170 Hz | 600 Hz: mark 2125 Hz, space 2295 Hz | 7040, 14083, 21083… |
| DIGI (FT8, FT4, PSK…) | sintonia USB-D | 100–3100 Hz | frequenze FT8: 7074, 14074, 21074… |
- La rotellina ha anche i passi da 10 e 50 Hz, comodi in CW e RTTY.
- Con la radio collegata (CAT) il modo della radio segue: CW, USB/LSB, RTTY, USB-D per il DIGI.
- DIGI con WSJT-X (o un altro programma digitale): in Windows (Impostazioni → Sistema → Audio → Mixer volume) manda l’audio di Edge («FZR SDR») su un cavo audio virtuale (es. VB-Cable) e in WSJT-X scegli quel cavo come ingresso. Cuffia DX e VFO B insieme e VFO B spento (🔇 VFO B).
⌨️ RTTY: lo skimmer FZRTTY
Nel modo RTTY lavora FZRTTY, uno skimmer RTTY multicanale pensato per i contest: trova da solo tutti i segnali RTTY che vedi nel waterfall e li decodifica tutti insieme, come fa lo skimmer CW.
- RTTY dei radioamatori: 45,45 baud, shift 170 Hz, Baudot con cambio lettere/cifre e «unshift on space». La frequenza di un segnale è il suo mark (la riga più alta), come sugli Icom.
- Il testo di ogni segnale compare accanto al waterfall, all’altezza del mark, con nominativi, CQ e 599 evidenziati; un «TOO» (599 con il cambio cifre perso) diventa 599.
- L’elenco stazioni si accende da solo: per ogni segnale il nominativo che ripete di più (non il tuo, che compare quando ti risponde), con frequenza e forza. Clic = VFO A su quella stazione.
- La riga in basso mostra il testo del DX (VFO A); in cuffia hai VFO A e VFO B come negli altri modi, con mark a 2125 Hz e space a 2295 Hz: l’audio si può mandare anche a MMTTY con un cavo audio virtuale.
- Un segnale nuovo viene ridecodificato dagli ultimi 3 secondi, così non perdi il nominativo detto all’inizio. Le coppie di righe che non si alternano (portanti, due CW vicini) vengono scartate, e un canale che dà solo caratteri rotti sparisce da solo.
- Memorie RTTY: mark a 7040, 14083, 21083… con il centro 15 kHz sopra, così hai tutto il segmento RTTY nel waterfall. Con «Larghezza» 30 o Tutto vedi più stazioni insieme.
🛰️ Chiavetta RTL-SDR, VHF/UHF, FM e AM
FZR SDR funziona anche senza Perseus, con una chiavetta RTL-SDR da pochi euro (RTL-SDR Blog V3/V4, Nooelec e simili): da 24 MHz a 1,7 GHz, cioè 10 m, 6 m, 2 m, 70 cm e 23 cm, più aeronautica, nautica, PMR446, satelliti. Con il direct sampling delle V3/V4 anche le onde corte, ma con meno dinamica del Perseus.
- Driver: la chiavetta vuole il driver WinUSB, quello che si installa con Zadig (lo stesso che serve a SDR#). Se SDR# o SDR++ la vedono già, è a posto.
- rtl_tcp: FZR SDR parla con la chiavetta attraverso
rtl_tcp.exe, che si trova nella sottocartellartldel programma e parte da solo. Così si può usare anche una chiavetta collegata a un altro computer (un Raspberry vicino all’antenna, per esempio): lì si avviartl_tcp -a 0.0.0.0e in FZR SDR si scrive il suo indirizzo nella casella rtl_tcp (es.192.168.1.50:1234). - Primo avvio: se il Perseus non c’è ma c’è una chiavetta, FZR SDR parte da solo con la chiavetta, in FM sui 2 m. Altrimenti: in basso Ricevitore → RTL-SDR (chiavetta) (con ✓ se il PC la vede).
- Impostazioni (⚙ Impostazioni → Ricevitore): Guadagno (Auto o a mano; se compaiono segnali fantasma abbassalo), HF (direct sampling per le onde corte con le V3/V4, ramo Q), Bias-T (alimenta un LNA o un upconverter dal cavo), AGC chip. Il menu Guadagno mostra i valori veri del tuner della chiavetta (R820T, E4000, FC0012/13). La chiavetta riceve 192 kHz alla volta; l’errore del quarzo si corregge con Calibra… su un ponte o un beacon (vedi Calibrazione) o scrivendolo in Correzione ppm.
- Fluidità: rtl_tcp manda i dati a pacchetti; FZR SDR lavora a 1,92 MS/s (un pacchetto ogni 68 ms) e fa scorrere il waterfall a velocità costante. L’audio ha circa 0,3 s di ritardo, il prezzo per non avere buchi. Se il PC resta indietro più di 1,5 s il programma salta in avanti e torna in tempo reale.
- Bande: i pulsanti diventano 10, 6, 2, 70cm, 23cm (con il direct sampling quelli delle onde corte). Ogni banda ricorda la sua memoria per ciascun modo, come in HF.
ADALM-Pluto
Al posto della chiavetta si può usare un ADALM-Pluto di Analog Devices: ⚙ Impostazioni → Ricevitore → ADALM-Pluto. FZR SDR parla con il server che gira dentro il Pluto (iiod), quindi non serve installare libiio sul PC.
- Via USB: installa il driver «PlutoSDR» di Analog Devices (vedi Download); con la USB il Pluto è anche una scheda di rete e risponde a
192.168.2.1, l’indirizzo di base. - In rete (LAN, con un adattatore Ethernet o dietro un altro PC): scrivi nella casella Indirizzo il suo IP o
pluto.local. - Guadagno: Auto (AGC del chip) oppure fisso da 0 a 70 dB.
- Frequenze: con il firmware standard il chip (AD9363) va da 325 a 3800 MHz, cioè 70 cm e 23 cm. Per i 2 m (e i 6 m) serve il firmware «sbloccato» come AD9364: da 70 MHz a 6 GHz, e in pratica il ricevitore scende fino a 46,9 MHz, con meno sensibilità sotto i 70 MHz: dal terminale del Pluto
fw_setenv attr_name compatible,fw_setenv attr_val ad9364, poireboot. - Waterfall largo: accanto al waterfall principale, lo spettro di tutta la banda ricevuta dal Pluto (288 kHz, 576 kHz, 1,15 o 1,7 MHz; si sceglie in Waterfall largo o con − e + / rotella). Con QO-100 si centra da solo su tutto il transponder (10489,5–10490 MHz, beacon compresi), come SDR Console; il riquadro bianco è la fetta che ascolti. Clic su un segnale = ci vai.
- Il Pluto lavora a 2,304 MS/s e FZR SDR ne tiene 192 kHz, come con la chiavetta. Il suo quarzo standard sbaglia di qualche decina di ppm (a 435 MHz anche 10 kHz): calibralo su un ponte con Calibra…. Con il TCXO montato l’errore è di 1 ppm o meno.
SpyServer (ricevitori in rete)
⚙ Impostazioni → Ricevitore → SpyServer (in rete) si collega a uno SpyServer di Airspy: un Airspy HF+, un Airspy R2/Mini o una chiavetta RTL-SDR condivisi in rete, anche dall’altra parte del mondo. Funziona come un ricevitore locale: skimmer CW, waterfall, VFO A/B, split, memorie, calibrazione; banda e frequenza spostano il ricevitore remoto.
- In Server scrivi o incolla l’indirizzo con la porta (es.
sdr.esempio.it:5555; va bene anche il linksdr://…) e premi Invio. I server usati restano nell’elenco della casella (gli ultimi 12). - 🌐 Trova server (elenco Airspy) apre l’elenco dei server pubblici sul sito di Airspy.
- Il programma riconosce il ricevitore e chiede la banda scelta; mostra solo le bande che quel ricevitore raggiunge. Il guadagno compare se il ricevitore ne ha e se nessun altro lo sta comandando: su un server condiviso, se lo comanda un altro, ci si sposta solo dentro la banda che sta ricevendo.
- Banda (48, 96 o 192 kHz) e Dati (8 o 16 bit) decidono quanti dati chiedi al server: 192 kHz a 16 bit sono circa 6 Mbit/s, 96 kHz a 8 bit 1,5 Mbit/s, 48 kHz a 8 bit meno di 1 Mbit/s. Se audio e waterfall vanno a singhiozzo il server non ce la fa: scendi di banda o passa a 8 bit. Accanto c’è la stima dei Mbit/s; nella barra di stato i campioni che arrivano davvero.
- Da Internet i dati arrivano meno regolari: l’audio ha più riserva (circa 0,4 s, che cresce da sola se il buffer si svuota). Sui server pubblici ci sono spesso posti limitati e un tempo massimo: usali con garbo.
KiwiSDR (ricevitori in rete)
⚙ Impostazioni → Ricevitore → KiwiSDR (in rete) si collega a un KiwiSDR: i ricevitori da 0 a 30 MHz che tanti radioamatori mettono a disposizione in Internet. Il Kiwi dà a ogni utente una fetta di circa ±5 kHz (12 kHz di IQ): il waterfall è stretto, ma skimmer CW, VFO A/B, split, SSB, AM, memorie e bande funzionano come con un ricevitore locale. Banda, memorie e frequenza scritta spostano la fetta; il DX resta un quinto sotto il centro, con spazio sopra per lo split.
- In Kiwi scrivi o incolla l’indirizzo con la porta (es.
kiwi.esempio.it:8073; va bene anche il link copiato dalla barra del browser) e premi Invio. I Kiwi usati restano nell’elenco della casella (gli ultimi 12). - 🌐 Trova Kiwi (mappa) apre la mappa dei KiwiSDR pubblici (rx.linkfanel.net), 🌐 Trova Kiwi (elenco) l’elenco sul sito KiwiSDR: apri quello che ti interessa e copia l’indirizzo.
- Waterfall largo: a sinistra compare il waterfall del Kiwi su 30–120 kHz (e più), con il riquadro della fetta ricevuta e la riga verde del DX. Clic su un segnale: la fetta e il DX vanno lì. −/+ o la rotella cambiano la larghezza. Lì si vede il pile-up; decodifica e audio restano nella fetta.
- Guadagno: Auto usa l’AGC del Kiwi; per lo skimmer un guadagno fisso (da 0 a 120 dB) tiene fermo il fondo quando passa un segnalone. Password solo per i Kiwi protetti.
- Ogni collegamento occupa un canale del Kiwi: se sono tutti occupati il programma lo dice. Molti Kiwi pubblici hanno un tempo massimo: usali con garbo.
QO-100 e convertitori
In ⚙ Impostazioni → Frequenza, Convertitore dice al programma cosa c’è davanti al ricevitore, così le frequenze mostrate, le memorie e le bande sono quelle vere.
- QO-100 (LNB 9750 MHz): con il Pluto o la chiavetta dietro un LNB (10489,5 MHz → 739,5 MHz). Compare il pulsante di banda QO-100: negli skimmer (Normal, DXpedition, Contest) il centro va sulla fetta CW (10489,505–540) con il beacon basso in vista; in SSB sulla fonia (10489,650–990); in DIGI su 10489,540. Nel banco di memorie c’è il gruppo QO-100 (con LNB) con i tre beacon.
- Le frequenze si scrivono vere:
10489,525(sono MHz) o10489525(kHz). - L’LNB sbaglia (da pochi Hz con il riferimento GPS a decine di kHz senza): Calibra…, scrivi
10489.5(beacon basso) e Misura. Con il convertitore la correzione va sull’oscillatore (LO MHz, al Hz), non sui ppm del ricevitore. Si può anche scrivere a mano in LO MHz. - Aggancio beacon (compare con il convertitore acceso): l’LNB scivola con la temperatura. Con la casella spuntata il programma ogni mezzo secondo cerca il beacon nella banda ricevuta (il CW basso 10489,500 negli skimmer, il PSK centrale 10489,750 in SSB) e corregge da solo l’oscillatore: le frequenze restano quelle vere e il VFO resta sulla stazione. Accanto si vede il beacon agganciato e di quanto si stava spostando; con ⚠ il beacon non c’è nella banda ricevuta o è troppo debole. All’inizio cerca entro ±40 kHz (un LNB comune sbaglia anche di 30 kHz), poi lo segue da vicino; in LO MHz si vede l’oscillatore vero dell’LNB, che resta salvato. Corregge risintonizzando il ricevitore di pochi Hz: centro, VFO, filtri e decodifica non si toccano, quindi niente buchi nell’audio.
- Con il Pluto l’aggancio è prudente: segue l’LNB a piccoli passi (al massimo 25 Hz per volta), un salto grande deve confermarsi prima di essere preso e non scambia una stazione per il beacon. Se perde il beacon per qualche secondo rifà da solo la ricerca dei tre beacon su tutti i 2,3 MHz. Mentre trasmetti si ferma, e riprende 1,5 s dopo.
- altro…: qualunque convertitore o transverter; scrivi l’oscillatore in MHz (negativo per un upconverter, es.
-125per un upconverter da 125 MHz davanti alla chiavetta). - Il convertitore è memorizzato per ciascun ricevitore; nessuno lo toglie.
QO-100: configurazione guidata e parametri (Pluto)
Con l’ADALM-Pluto la preparazione per QO-100 è guidata: ⚙ Impostazioni → Frequenza → 🛰 QO-100 (anche dal pulsante 🛰 QO-100 nella barra TX). La finestra ha due schede: Configurazione guidata, i tre passi qui sotto, e Parametri, con tutte le impostazioni di QO-100 in una pagina (oscillatore dell’LNB, aggancio al beacon, TX, PWR, correzione TX, XIT, Segui la mia eco, full duplex, Inverti I/Q, velocità CW, microfono e processore SSB, skimmer RTTY). Se l’LNB è già impostato si apre direttamente sui Parametri.
- 1 · Ricezione: Imposta mette il convertitore QO-100 (LNB 9750 MHz) e va sulla fetta CW con i beacon in vista.
- 2 · Correggi l’LNB: Cerca i beacon cerca insieme i tre beacon (CW basso, PSK, CW alto: hanno distanze fisse) in tutti i 2,3 MHz del Pluto e dice di quanto sbaglia l’oscillatore dell’LNB, anche di centinaia di kHz. Confermi con Correggi e aggancia (c’è sempre, anche se l’errore è piccolo): da lì l’aggancio al beacon rifinisce al Hz e segue la deriva.
- 3 · Allinea il TX: Accendi il TX, Punto libero porta il VFO A in un punto libero della fetta CW, poi Calibra TX misura da solo l’errore del quarzo del Pluto: manda «VVV VVV VVV» a 18 WPM e riconosce la tua eco dal ritmo del tasto, entro ±40 kHz, quindi non la confonde con le altre stazioni. Se con la correzione salvata non la trova (correzione sballata), riprova da zero. Azzera correzione riporta la correzione TX a 0. In alternativa Portante + Sincro: 8 s di portante e clicchi tu la tua eco sul waterfall.
- Fatto questo trasmetti esattamente dove sta la riga del VFO A; Segui la mia eco tiene l’allineamento mentre il Pluto si scalda e lo XIT ti fa ritoccare a orecchio (vedi Sincro TX/RX).
Trasmettere in CW su QO-100 (Pluto)
Con il Pluto dietro l’LNB (convertitore QO-100) compare la barra rossa TX QO-100: il Pluto trasmette in CW sulla salita a 2400 MHz mentre ricevi la discesa a 10489 MHz, e il tuo segnale torna dal satellite sul waterfall (circa 0,27 s dopo), decodificato dallo skimmer come gli altri.
- Serve un amplificatore con il filtro: il Pluto da solo dà pochi milliwatt e ha armoniche. Parti con PWR basso (−30 dB) e alza piano guardando il tuo segnale sulla discesa: non deve superare il beacon.
- ⏻ TX abilita la trasmissione. La frequenza di salita segue il VFO A (il VFO B con SPLIT, vedi sotto): discesa − 8089,5 MHz più la correzione TX e lo XIT. Segue anche mentre trasmetti: se giri la manopola la salita si sposta con te. Fuori dal transponder o a meno di 4 kHz da un beacon il programma non trasmette, e se ci arrivi girando la manopola si ferma.
- Clic su una stazione CW: il VFO A va sulla sua portante, al Hz (la cerca entro ±80 Hz dal clic). Nel log: «VFO A sulla stazione: … (−40 Hz dal clic)». Così trasmetti esattamente sulla sua frequenza.
- F1–F6 (pulsanti o tasti) mandano le macro; nella casella scrivi un testo e premi Invio. ■ STOP o Esc fermano subito. Velocità in WPM. Le macro si cambiano in ⚙ Impostazioni → Frequenza:
{CALL}è il tuo nominativo,{DX}quello del corrispondente (vedi sotto), i prosegni si scrivono<SK>,<AR>,<KN>. - Suo call (2.9.2): la casella nella barra TX, prima delle macro, contiene il nominativo del corrispondente e nelle macro prende il posto di
{DX}. Per riempirla clicca il suo nominativo nella riga RX in basso (lampeggia in giallo), oppure scrivilo. Resta lì finché non lo cambi. Una macro con{DX}e la casella vuota non parte: il programma te lo dice. - Calibra TX: il quarzo del Pluto sbaglia di qualche ppm, cioè qualche kHz a 2,4 GHz. Metti il VFO A in un punto libero della fetta CW e premi: il programma manda «VVV VVV VVV», riconosce la tua eco sulla discesa dal ritmo del tasto e corregge da solo la salita. Poi il tuo segnale cade esattamente dove clicchi. Meglio con l’aggancio beacon acceso.
- Full duplex (acceso): mentre trasmetti continui ad ascoltare e senti il tuo segnale tornare dal satellite. Spento = semiduplex: l’audio è muto mentre trasmetti.
- Portante: 5 s di portante per regolare l’amplificatore. Se il tuo segnale non compare sulla discesa, prova Inverti I/Q (⚙ Impostazioni → Frequenza).
- Il CW usa il generatore di toni del Pluto (+500 kHz dall’oscillatore): portante residua e immagine cadono sotto 2400 MHz, fuori dal transponder. La manipolazione ha una rampa di pochi millisecondi (niente clic). L’oscillatore TX si accende solo mentre trasmetti.
Trasmettere in SSB su QO-100 (Pluto)
In modo SSB la barra TX mostra 🎤 PTT al posto delle macro CW: clic per trasmettere in USB dove sta il VFO A, clic (o Esc, o ■ STOP) per tornare in ricezione. Il PTT si spegne da solo dopo 5 minuti. Se giri la manopola mentre parli, la salita segue il VFO.
- In ⚙ Impostazioni → Frequenza scegli il Microfono e regola Guadagno mic: parlando normale la barretta MIC deve arrivare nel giallo.
- Processore (0–20 dB, 0 = spento): alza le parti deboli della voce e taglia le creste del segnale SSB già formato, come il processore a RF delle radio: più potenza media a parità di picco, con le spurie sotto −75 dB. Per l’uso normale 8–12 dB; spento per i modi digitali. Accanto alla barretta MIC si vede quanto lavora.
- Equalizzatore a 5 bande (200, 400, 800, 1600, 2600 Hz, ±12 dB; doppio clic = 0) con tre preimpostazioni: Piatto, DX (meno bassi e più alti, buca il rumore) e Caldo (voce piena per le chiacchierate).
- Prova voce (5 s): registra cinque secondi dal microfono senza trasmettere e te li fa riascoltare; dice anche se il guadagno è troppo alto o troppo basso. ▶ Originale e ▶ Elaborato si possono riascoltare quante volte vuoi: ritocca processore ed equalizzatore e senti subito la differenza sulla stessa frase. Le regolazioni valgono subito, anche mentre trasmetti.
- La voce passa da un filtro 300–2700 Hz che fa da solo la banda laterale superiore; il segnale è a +500 kHz dall’oscillatore come il CW (portante residua e immagine fuori dal transponder) e le spurie stanno sotto −75 dB.
- Il Pluto riceve e trasmette insieme (2,3 milioni di campioni al secondo per verso): con Full duplex ti senti tornare dal satellite. Prima di usarla la prima volta fai Prova streaming (⚙ Impostazioni → Frequenza): deve dire REGGE.
Allineare TX e RX: Sincro TX/RX
Il tuo segnale deve tornare dal satellite esattamente sulla riga del VFO A. Il quarzo del Pluto sbaglia di qualche kHz a 2,4 GHz e si sposta quando si scalda: il programma lo corregge con la Correzione TX (⚙ Impostazioni → Frequenza), che vale per tutto il transponder. Prima allinea la ricezione con l’aggancio beacon, poi la trasmissione.
- Sincro TX/RX (il più rapido): trasmetti (Portante o un messaggio CW), premi Sincro TX/RX (diventa «Clicca la tua eco…») e clicca sulla tua eco nel waterfall. Il clic non sintonizza: misura di quanto l’eco è fuori dalla riga e sposta la correzione di altrettanto. Nella barra di stato: «TX sincronizzato sulla tua eco: … Hz». Da lì cambi frequenza e resti allineato. Un clic a più di 20 kHz dalla riga non viene preso.
- Calibra TX: la stessa cosa in automatico, con una portante di 4 s (vedi sopra).
- Segui la mia eco (acceso di serie): dopo ogni messaggio CW, dalle macro o dal paddle, il programma misura dove è tornata la tua eco e corregge da solo, al massimo 150 Hz per volta. La tua eco la riconosce dal ritmo del tuo tasto, non da quanto è forte: una stazione vicina più forte non lo inganna. Così segue il Pluto che si scalda.
- XIT (ritocco fine, deciso da te): i pulsanti −10 −1 XIT +1 +10 nella barra TX spostano la tua trasmissione di pochi Hz; 0 la riporta a zero; con la rotellina sul valore 1 Hz (Maiusc 10 Hz). Vale subito, anche mentre trasmetti: in full duplex porti la tua eco esattamente sulla stazione. Lo XIT resta cambiando frequenza e non viene toccato da Sincro, Calibra o Segui la mia eco: è il tuo «un pelo più su» che il corrispondente non deve notare.
- La Correzione TX si può anche scrivere a mano (in Hz); Azzera correzione la riporta a 0.
Trasmettere in RTTY su QO-100 (Pluto)
Dalla 2.8 il programma trasmette RTTY da solo: niente MMTTY, niente cavo audio virtuale. Metti il modo RTTY e accendi ⏻ TX: la barra TX ha le macro RTTY e la casella del testo.
- RTTY dei radioamatori: 45,45 baud, shift 170 Hz, Baudot con cambio lettere/cifre automatico, 1,5 bit di stop, fase continua e passaggi mark/space ammorbiditi (a 500 Hz dal mark il segnale è già 60 dB sotto: niente splatter).
- Frequenza: il mark cade esattamente sul VFO A (sul VFO B con SPLIT), lo space 170 Hz sotto, come in FSK. Valgono la correzione TX e lo XIT.
- F1–F6 mandano le macro; nella casella scrivi un testo e premi Invio. Puoi scrivere mentre trasmette: il testo va in coda e la trasmissione continua senza buchi. Il testo che esce si vede nella barra TX.
- PTT automatico: prima del testo circa un secondo di «diddle» (LTRS) per far agganciare chi riceve, alla fine due LTRS e torna in ricezione da solo. ■ STOP o Esc fermano subito.
- Le macro RTTY sono una serie a parte da quelle CW (si modificano nella stessa finestra stando in RTTY). Di serie:
CQ CQ CQ DE {CALL} {CALL} {CALL} PSE K,{DX} DE {CALL} {CALL} K,{DX} TU 599 599 {CALL},{DX} TU 73 DE {CALL} SK,QRZ? DE {CALL},{DX} RR TU 73. Le macro vanno a capo da sole all’inizio e alla fine. - Prendere il nominativo di chi ti risponde: clic sul suo call nella riga RX → va nella casella Suo call e da lì in
{DX}. - In Full duplex la riga RX mostra la tua eco decodificata: controlli da solo che il segnale esca giusto.
- Per i QSO tieni lo Skimmer RTTY spento: decodifica solo il VFO A e lascia il processore libero.
Paddle su porta COM
Puoi manipolare con il tuo paddle (o un tasto verticale) collegato al PC con un adattatore USB-seriale: il programma legge i due contatti, fa il keyer iambico e manipola il Pluto. Va bene anche l’HaliKey Serial.

- Collegamento: punto (punta del jack) su CTS, linea (anello) su DSR o DCD. Con il cavo USB-seriale con DB9 (RS-232): punto al pin 8, linea al pin 6, il comune al pin 4 (DTR) con una resistenza da 1 kΩ in serie; il comune non va a massa. Con una schedina TTL FT232RL il comune va a GND. Le schedine economiche a 6 piedini hanno solo CTS: serve quella con DSR.
- In ⚙ Impostazioni → Frequenza, riquadro Paddle (porta COM): scegli la Porta e il Modo: Iambico B (con le leve strette e poi lasciate aggiunge un segno), Iambico A (si ferma subito) o Tasto verticale. Velocità in WPM, la stessa delle macro. Se punto e linea sono scambiati: Inverti paddle.
- Sidetone: la nota di controllo la fa la pagina, senza ritardo (l’eco del satellite torna dopo 0,27 s: manipolare ascoltando quella è impossibile). Nota e volume si regolano. Il browser fa partire l’audio solo dopo il primo clic sulla pagina.
- Con ⏻ TX acceso il paddle trasmette sulla salita del VFO A, con gli stessi controlli delle macro (transponder e beacon); quello che mandi compare decodificato nella barra TX. Con il TX spento, o con un altro ricevitore, suona solo il sidetone: ci si può esercitare.
- Il paddle ha la precedenza: se tocchi le leve mentre va una macro, la macro si ferma; mentre manipoli le macro non partono. Dopo l’ultimo segno l’oscillatore TX resta acceso 0,8 s, per le pause fra lettere e parole, poi si spegne.
- Se stacchi l’adattatore il programma lo dice e riprova ad aprire la porta ogni 10 s.
- Prima prova: TX spento, solo sidetone. Se punti e linee escono giusti, il cavo è a posto.
FM e AM
- Nei modi Ricevitore ci sono FM (banda stretta: ripetitori, simplex, PMR, nautica, satelliti) e AM (aeronautica, 10 m). Funzionano con tutti i ricevitori, anche in HF (FM sui 10 m).
- VFO A e VFO B, SPLIT, mute, volumi, NB e NR funzionano come in SSB: per esempio VFO A sull’uscita del ripetitore e VFO B sull’ingresso.
- Filtro da 6 a 25 kHz (FM 12 kHz per i canali da 12,5 kHz, 16 o 25 kHz per quelli larghi; AM 8 kHz).
- SQL (squelch): chiude l’audio quando sul canale c’è solo rumore; 0 = sempre aperto, più a destra = serve un segnale più forte (doppio clic = 0). La spia SQ accanto a VFO A e VFO B si accende quando il canale è aperto.
- Passo dei canali: 5, 6,25, 8,33 (aeronautica), 12,5 e 25 kHz, per VFO A e VFO B.
- Lo S-meter sopra i 30 MHz usa la scala VHF (S9 = −93 dBm).
🛰️ Guida QO-100 con il Pluto, dall’LNB al QSO
Tutto il percorso, nell’ordine giusto: la stazione, la prima configurazione (una volta sola), quello che si fa a ogni accensione e come tenere TX e RX allineati durante la giornata. I dettagli dei singoli comandi sono nei capitoli QO-100 qui sopra.
1 · La stazione
- Ricezione: parabola con LNB (oscillatore 9750 MHz). La discesa 10489,5–10490 MHz esce a 739,5–740 MHz e va all’ingresso RX del Pluto. L’LNB vuole l’alimentazione sul coassiale (bias-T, 12–18 V). Un LNB con riferimento esterno (PLL, GPSDO) sbaglia di pochi Hz; uno comune di decine di kHz e scivola con la temperatura: il programma corregge tutti e due.
- Trasmissione: uscita TX del Pluto (2400 MHz, pochi mW) → filtro → amplificatore → illuminatore in banda S. Il filtro serve: il Pluto da solo ha armoniche e spurie.
- Il quarzo del Pluto sbaglia di qualche ppm (qualche kHz a 2,4 GHz) e si sposta quando si scalda. Un Pluto con TCXO o riferimento esterno è molto più stabile, ma il programma corregge comunque (Calibra TX, Segui la mia eco).
- Collegamento al PC: via USB (driver «PlutoSDR» di Analog Devices, indirizzo
192.168.2.1) o in rete (scrivi il suo indirizzo). Con la rete la ricezione è più regolare.
2 · Prima configurazione (una volta sola)
- In basso scegli ADALM-Pluto come ricevitore e scrivi il suo indirizzo. Campionamento 192 kHz (il Pluto lavora a 2,304 MS/s e il programma riduce): con un PC lento 96 kHz.
- ⚙ Impostazioni → Frequenza → 🛰 QO-100 → Configurazione guidata → 1 · Ricezione → Imposta: mette il convertitore QO-100 (LNB 9750 MHz) e va sulla fetta CW con i beacon in vista.
- 2 · Correggi l’LNB → Cerca i beacon: trova i tre beacon (10489,500 CW, 10489,750 PSK, 10490,000 CW) in tutti i 2,3 MHz del Pluto e misura l’errore dell’LNB, anche di centinaia di kHz. Correggi e aggancia: da qui le frequenze sul waterfall sono quelle vere e l’aggancio beacon segue la deriva. In basso compare «🔒 10489.500 · +0 Hz».
- Prova streaming (⚙ Impostazioni → Frequenza): deve dire REGGE. Serve per SSB e RTTY, dove il Pluto riceve e trasmette insieme. Se non regge: rete invece di USB, o campionamento più basso.
- Scegli il Microfono e regola il guadagno (SSB), imposta le macro CW e RTTY con il tuo nominativo (
{CALL}è quello dell’RBN, in ⚙ Impostazioni). - PWR basso (−30 dB) per cominciare. ⏻ TX, poi Portante (5 s): il tuo segnale deve comparire sulla discesa dopo circa 0,27 s. Alza PWR finché sei sotto il beacon, mai sopra. Se la portante non compare da nessuna parte, prova Inverti I/Q.
- 3 · Allinea il TX → Punto libero → Calibra TX: manda «VVV VVV VVV», riconosce la tua eco e corregge la salita (Correzione TX). Il risultato resta salvato.
3 · A ogni accensione
- Avvia FZR SDR e aspetta che compaia 🔒 accanto al beacon: l’LNB è agganciato. Se dopo un minuto c’è ⚠, rifai il passo 2 (Cerca i beacon).
- Lascia scaldare il Pluto 10–15 minuti (anche solo in ricezione, con ⏻ TX acceso): il suo quarzo si sposta soprattutto all’inizio.
- Vai in un punto libero della fetta CW e premi Calibra TX. Da qui trasmetti dove sta la riga del VFO A (o del VFO B con SPLIT).
- Tieni acceso Segui la mia eco: dopo ogni messaggio CW corregge da solo i piccoli spostamenti del Pluto.
4 · Durante la giornata: tenere allineato il TX
- Controllo veloce, con Full duplex acceso: manda un messaggio (in CW «VVV» o la tua macro) e guarda la tua eco sul waterfall. Deve stare sulla riga del VFO A. In RTTY guarda che la riga RX decodifichi il tuo testo; in SSB ascoltati.
- Ogni ora circa, o quando cambia molto la temperatura (sole sul Pluto, stanza che si scalda), o se l’eco è fuori di più di 20–30 Hz: Calibra TX in un punto libero. Bastano pochi secondi.
- In SSB e RTTY Segui la mia eco non lavora (serve il ritmo del tasto CW): ogni tanto un Calibra TX, o Sincro TX/RX cliccando la tua eco.
- Ritocco fine: se il corrispondente ti dice che sei un pelo fuori, usa lo XIT (±1 Hz). Lo XIT resta cambiando frequenza e non viene toccato dalle calibrazioni.
- Per lavorare una stazione: in CW clic sulla sua traccia (il VFO A va sulla portante al Hz), in SSB e RTTY sintonizza il VFO A su di lui; poi clic sul suo nominativo nella riga RX per metterlo in Suo call e usa le macro con
{DX}. - Se l’aggancio beacon mostra ⚠ (beacon perso, LNB che salta), il programma rifà da solo la ricerca dei tre beacon; se non basta, ripeti il passo 2.
| Cosa | Quando | Comando |
|---|---|---|
| LNB (ricezione) | la prima volta, o se l’aggancio non trova il beacon | 3 passi → Cerca i beacon → Correggi e aggancia |
| Deriva dell’LNB | sempre, da solo | Aggancio beacon 🔒 |
| Quarzo del Pluto (trasmissione) | a ogni accensione dopo 10–15 min, poi ogni ora circa | Calibra TX (punto libero) |
| Piccoli spostamenti in CW | dopo ogni messaggio, da solo | Segui la mia eco |
| Ritocco a orecchio | quando serve | XIT ±1 / ±10 Hz |
📒 Banco di memorie
Il pulsante 📒 Memorie (accanto a «Salva memoria», tasto K) apre il banco di memorie: frequenze con un nome, il modo e un gruppo, per tutti i ricevitori e tutti i modi (anche HF: un DX, una rete, una frequenza di contest).
- Clic su una memoria: FZR SDR va su quella frequenza, nel suo modo, con il suo filtro (e squelch in FM/AM); il centro si sposta sempre, con la memoria un quinto di banda sotto il centro (a 192 kHz 38 kHz), lontana dal picco centrale e con spazio sopra per lo split. Il pannello resta aperto, così si passa da una memoria all’altra.
- + Salva qui: salva la frequenza di VFO A con il modo e le impostazioni attuali; scrivi il nome e il gruppo (quelli che hai già si scelgono dall’elenco).
- ✎ modifica nome, gruppo, frequenza e modo; 🗑 cancella (secondo clic per confermare).
- Cerca per nome o frequenza, e filtra per gruppo.
- Al primo uso il banco ha già 354 memorie, divise per gruppo: radioamatori 10 m, 6 m, 2 m, 70 cm e 23 cm (chiamate CW, SSB, FM e FT8, APRS, ISS voce, APRS e ripetitore), ripetitori 2 m R0–R7 e R0x–R7x (uscita), ripetitori 70 cm nelle tre griglie usate in Italia (uscita 430,0125–430,400 e 431,2125–431,600 con shift +1,6 MHz, 430,500–431,100 con +5 MHz, 438,650–439,425 IARU con −7,6 MHz), PMR446 1–16, LPD 1–69, aeronautica (121,5 emergenza, 123,45 aria-aria, 243,0 emergenza militare), aeroporti del Nord-Ovest (Malpensa, Linate, Milano Radar e Milano Informazioni, Caselle, Aosta AFIS, 123,1 soccorso: ATIS, TWR, GND e APP; le frequenze degli aeroporti ogni tanto cambiano, si correggono con ✎), nautica (canali 16, 6, 9, 13, 70 DSC e AIS), QO-100 (beacon, fetta CW, FT8, fonia: con il convertitore). Preset rimette quelli che hai cancellato; aggiornando il programma arrivano da soli quelli nuovi, le tue memorie non si toccano. Onde corte (dalla 2.9.6): beacon NCDXF/IARU, FT8 da 160 a 10 m, frequenze di emergenza IARU, QRP CW e SSB, SSTV, segnali orari (DCF77, CHU, RWM, WWV), Shannon VOLMET; in QO-100 anche la frequenza di emergenza 10489,860.
- Se una memoria è fuori dalla portata del ricevitore in uso (per esempio 145,5 MHz con il Perseus) il programma lo dice e resta dov’è.
- Le memorie stanno in
fzrsdr.jsoninsieme alle altre impostazioni.
Importare i ponti (IK2ANE) e i canali di CHIRP
Nel banco di memorie il pulsante 📥 Importa ponti… apre un elenco preso dal PC.
- Elenco ponti di IK2ANE: scarica
pontixls.xlsda ik2ane.it («DOWNLOAD PONTI.xls») e sceglilo. Si importano per regione e provincia (spuntando la regione si prendono tutte le sue province) oppure entro N km dal tuo locatore, solo le bande che vuoi (2 m e 70 cm di base) e, se vuoi, anche i ponti solo digitali (DMR, C4FM, D-STAR: qui non si decodificano, restano come promemoria). L’anteprima dice quanti ponti entrano e in quali gruppi. - Ogni ponte diventa una memoria FM sulla frequenza d’uscita, nel gruppo Ponti <provincia> (es. «Ponti BI»), con nome, nominativo e località; sotto, in piccolo, shift, tono CTCSS, sistema, locatore e gestore: quello che serve per trasmettere con la radio.
- Reimportando il file aggiornato i ponti dei gruppi scelti si aggiornano; le tue memorie non si toccano. L’elenco è © Walter De Vercelli IK2ANE, gratuito per uso privato dei radioamatori citando l’autore.
- CSV di CHIRP: i canali che hai programmato nei portatili (FM, AM, SSB, CW) entrano in un gruppo con il nome del file.
- Il 🗑 accanto al nome di un gruppo lo cancella tutto (secondo clic per confermare).
🔤 Nominativi e decodifica
Il decoder segue ogni segnale CW sulla sua frequenza esatta, misura da solo la velocità e ignora i disturbi brevi. Per rendere più sicuri i nominativi usa tre aiuti, in quest’ordine:
- Reverse Beacon Network: se il nominativo decodificato coincide con uno spottato lì vicino, è sicuro.
- Ripetizione: chi chiama ripete il proprio call. Quando lo stesso nominativo esce due volte sullo stesso segnale diventa confermato, e le letture storpiate di quel segnale (una lettera sbagliata, l’inizio perso) vengono mostrate corrette con il ?, anche quelle arrivate prima.
- Elenco nominativi: se nella cartella c’è
MASTER.SCP(Super Check Partial, da supercheckpartial.com o dalla cartella di N1MM),MASTER.DTA(CW Skimmer) oppurecallsign.dat/nominativi.txtcon un nominativo per riga, i call presenti vengono evidenziati e quelli che differiscono di una sola lettera vengono suggeriti con il ?.
Le parole attaccate per uno spazio troppo corto (CQCQDE, DL1ABCTEST, TU5NN203) vengono separate da sole.
📡 Reverse Beacon Network
- Pulsante RBN (accanto a Elenco) o casella RBN in ⚙ Impostazioni → Rete e radio: accende e spegne il collegamento a telnet.reversebeacon.net, solo CW. Si usa il nominativo della registrazione; se non sei registrato compare il campo Nominativo.
- Pulsante Spot: mostra o nasconde le etichette sul waterfall. Gli spot compaiono in viola sul bordo sinistro, sulla loro frequenza, con i dB; sbiadiscono con il tempo e spariscono dopo 15 minuti.
- L’RBN spotta chi chiama CQ: il DX e le stazioni in contest, quasi mai i chiamanti di un pile-up.
⏺️ Registrare e riascoltare
Nel riquadro Audio del pannello radio (nei modi Skimmer in forma compatta: 💾 m:ss e ● REC):
- 💾 Salva ultimi m:ss: FZR SDR tiene sempre in memoria gli ultimi minuti ricevuti; il pulsante li scrive su disco senza fermare il ricevitore. Comodo per controllare con calma se il DX ti ha messo a log. Quanti minuti tenere si sceglie in basso alla voce Memoria (spenta, 1, 2, 5, 10 minuti; a 96 kHz servono circa 23 MB di RAM al minuto).
- ⏺ Registra: registra su disco da quel momento finché non lo premi di nuovo (circa 35 MB al minuto a 96 kHz). Cambiando banda il file si chiude e ne parte un altro.
- 📂: apre la cartella
registrazioni.
I file sono WAV IQ a 24 bit, con centro e DX scritti dentro e nel nome (es. FZR_20261017_121500Z_18085.000kHz_DX18080.00.wav); si aprono anche con HDSDR, SDR Console e CW Skimmer.
Per riascoltare: Ricevitore → Registrazione (WAV). Il Perseus si ferma e compare la barra di riproduzione: ▶/⏸ (anche la barra spaziatrice), −15 s, cursore della posizione, elenco delle registrazioni e Sfoglia… per aprire qualsiasi WAV IQ. Waterfall, decodifica e ricerca dell’ascolto funzionano come dal vivo. Per le registrazioni di CW Skimmer, che non salvano la frequenza, scrivila in Centro kHz: viene ricordata per quel file. Torna al ricevitore riaccende il Perseus.
↑ Torna all’indice principale⌨️ Mouse e tastiera
| Comando | Effetto |
|---|---|
| Rotellina / trascinamento | scorre il waterfall (l’audio resta sul DX) |
| Ctrl + clic | DX esattamente lì (passo 10 Hz) |
| Ctrl + rotellina | sposta il DX di 50 Hz (con Maiusc 10 Hz) |
| Tasto destro (o pressione lunga sul tablet) | menu: Imposta il DX qui, Segnaposto qui / Togli questo segnaposto, Togli tutti i segnaposti, Centra la vista qui |
| PagSu / PagGiù | ±5 kHz |
| Frecce su / giù | scorrono la vista |
| Frecce sinistra / destra | spostano il DX di 50 Hz (con Maiusc 10 Hz) |
| Home | torna al DX |
| S | SPLIT acceso / spento (modi Ricevitore) |
| B / N | NB / NR: livello successivo |
| K | apre / chiude il banco di memorie |
| Barra spaziatrice | pausa / riprendi nella riproduzione |
| Doppio clic su Luce o Contrasto | valore iniziale |
📱 Uso dal tablet
FZR SDR si può guardare anche da un tablet o un telefono collegati alla rete di casa: apri nel browser l’indirizzo scritto in fzrsdr.log, del tipo http://192.168.x.x:8073. Dal tablet chiudere il browser non spegne nulla: per spegnere usa Esci. Chiudendo invece la finestra sul PC si spegne tutto.
❓ Problemi e soluzioni
🔴 Il ricevitore non parte
Chiudi CW Skimmer, HDSDR e il software Perseus; premi Riavvia ricevitore. Controlla in Gestione attività che non ci sia un altro FZR SDR acceso.
🔴 ExtIO: «Nessun plugin ExtIO trovato» o «impossibile caricare il plugin»
Installa il plugin a 32 bit per HDSDR del ricevitore e il suo driver, poi Plugin → Sfoglia…. Chiudi HDSDR: il ricevitore lo usa un programma per volta.
🔴 I segnali sono un po’ fuori frequenza (es. i nominativi dell’RBN non coincidono)
Calibra il ricevitore: Calibrazione della frequenza.
🔴 Stazioni specchiate rispetto al centro
Spunta Inverti I/Q.
🔴 Chiavetta RTL: in FM vedo la portante ma non sento niente
La chiavetta è fuori frequenza: Calibra… su un ponte (vedi Calibrazione).
🔴 QO-100: le stazioni sono spostate (es. l’FT8 non è a 10489,540)
L’LNB non è a 9750,000 MHz esatti: spunta Aggancio beacon con il beacon in vista, oppure Calibra… su 10489.5.
🔴 Waterfall lento e audio a scatti (soprattutto in DXpedition e Contest)
La pagina disegna al massimo 30 volte al secondo e si limita da sola; se va ancora a scatti, controlla che nella finestra di Edge la grafica sia accelerata: edge://gpu, alla voce «Canvas» deve esserci «Hardware accelerated».
🔴 Chiavetta RTL a scatti
Guarda in fzrsdr.log la riga che si ripete ogni 3 s: «dati» sotto 192 k = la chiavetta o la USB non tengono il passo (prova un’altra porta USB, senza hub); «calcolo» vicino al 100% = il PC non ce la fa; «rtl_tcp in coda» = il programma resta indietro.
🔴 Nessun audio
Premi Volume: il browser accende l’audio solo dopo un clic.
🔴 Troppa decodifica sbagliata
Sensibilità Media o Bassa; restringi il Filtro RX.
🔴 Waterfall troppo scuro o chiaro
Cursori Luce e Contrasto, o un’altra tavolozza in Colori.
🔴 In Gestione attività ci sono due FZRSDR.exe
È normale: l’exe “a file unico” è composto da due processi. Alla chiusura spariscono tutti e due entro pochi secondi.
🔴 “Persi” che cresce nel log
Il PC non tiene il passo: scegli un campionamento più basso (48 kHz).
🔴 In RTTY la ricezione va a scatti
Lo skimmer RTTY su tutta la banda pesa troppo (nel log «calcolo» sopra il 90% e «coda» che cresce): spegni Skimmer RTTY, decodifichi solo il VFO A.
🔴 Premo una macro RTTY e non trasmette
Controlla che ⏻ TX sia acceso e che il VFO sia dentro il transponder. Nel log c’è una riga «TX RTTY: richiesta …» per ogni F1 o Invio, e sotto il motivo se non è partito. Se la macro contiene {DX}, riempi prima la casella Suo call.
🔴 Il log dice «FZR Skimmer 1.83»
Stai avviando l’exe vecchio. Cancella FZRSkimmer.exe e l’icona «FZR Skimmer», poi rifai il setup di FZR SDR.
🔴 La mia eco CW è un po’ sotto o sopra la stazione
Prima Calibra TX, poi ritocca con lo XIT (±1 Hz): resta anche cambiando frequenza.
🔴 Il paddle non fa nulla
In ⚙ Impostazioni → Frequenza, riquadro Paddle, sotto c’è l’errore della porta. Con il cavo DB9 il comune va su DTR, non a massa; con la schedina TTL va a massa. Prova con il TX spento: deve suonare il sidetone (clicca prima una volta sulla pagina).
🔴 Qualcos’altro
Guarda fzrsdr.log nella cartella del programma e mandamelo.
FZR SDR è un programma di IW1FZR. Il Perseus è un prodotto Microtelecom; i suoi file (perseususb.dll, .sbs) non sono distribuiti con FZR SDR e vanno presi dal sito del produttore.
↑ Torna all’indice principale
FZR SDR
CW skimmer and SDR receiver for pile-ups, contests, VHF/UHF and QO-100 · Perseus, RTL-SDR, ADALM-Pluto, SpyServer, ExtIO, sound card · IW1FZR Amateur Radio Tools
📚 FZR SDR Documentation — Quick Index
📖 FZR SDR User Manual
FZR SDR is a CW skimmer and SDR receiver for split pile-ups, contests and everyday listening, from shortwave to microwaves. It works with the Perseus, RTL-SDR dongles, the ADALM-Pluto, receivers with an ExtIO plugin (SDRplay, Airspy HF+…), SpyServers and KiwiSDRs on the network and any radio through the sound card; with an LNB also QO-100.
The waterfall scrolls freely across the whole received band, with the spectrum next to it. In the Skimmer modes the decoded CW text appears next to each signal, with callsigns and 5NN highlighted; in DXpedition the audio stays locked on the DX and after each report the program marks where the worked station answered, that is where the DX is listening. In the Receiver modes (CW, SSB, RTTY with the FZRTTY skimmer, DIGI, FM and AM) there are two VFOs in stereo, VFO A on the DX and VFO B to find who is answering, with S-meter, NB, NR and NOTCH, a memory bank and radio control via CAT.
[Image: FZR SDR main screen]
🚀 Getting started
🎛️ Using it
🧰 What you need
- A PC with Windows 10 or 11 (FZR SDR is 32-bit and also runs on 64-bit Windows).
- Microsoft Edge (already in Windows) or Google Chrome: they only draw the window.
- A receiver: Perseus (the best way), or a radio connected to the sound card, or an IQ receiver (SoftRock and similar), or a receiver with an HDSDR ExtIO plugin (SDRplay RSP, Airspy HF+ and others), or an RTL-SDR dongle for VHF/UHF (see RTL-SDR dongle).
- For the Perseus: the files
perseususb.dllandperseus*.sbs, which CW Skimmer or Perseus software users already have (prepara_cartella.bat copies them from there). Otherwise they are all in the official package ExtIO Perseus 2.4a (Microtelecom); the Perseus USB driver is in the Perseus driver 2026a1 package. Help: Perseus users group. - Optional: an Internet connection for the Reverse Beacon Network.
⬇️ Downloads: extra files and programs
Besides FZR SDR, depending on the receiver and the features you use, a few files are needed that cannot be distributed with the program. All links go to the official sites.
| What | Needed for | Where |
|---|---|---|
| Perseus USB driver | Perseus, if Windows does not recognise it (no CW Skimmer or Perseus software) | Microtelecom · PerseusDriversUpdate |
| perseususb.dll and .sbs files | Perseus (the setup copies them from CW Skimmer or the Perseus software, if present) | Microtelecom · ExtIO_perseus |
| CW Skimmer | optional: its users already have the Perseus files | dxatlas.com/CwSkimmer |
| Zadig (WinUSB driver) | RTL-SDR dongle: installed once, as for SDR# | zadig.akeo.ie |
| PlutoSDR driver (Analog Devices) | ADALM-Pluto connected by USB | wiki.analog.com · Pluto drivers |
| rtl_tcp and RTL-SDR Blog drivers | RTL-SDR dongle (already in the program rtl folder; from here if missing) | github.com/rtlsdrblog/rtl-sdr-blog |
| Microsoft Visual C++ Redistributable | only if rtl_tcp.exe does not start (missing VCRUNTIME or MSVCP) | Microsoft · VC++ Redistributable |
| Hamlib (rigctld) | radio control (CAT): the latest Windows version | github.com/Hamlib/Hamlib |
| SDRplay API and ExtIO plugin | SDRplay RSP receivers (ExtIO) | sdrplay.com · Windows |
| Airspy HF+ ExtIO plugin | Airspy HF+ and Discovery (ExtIO) | airspy.com/download |
| HDSDR | optional: the ExtIO plugins are the same | hdsdr.de |
| MASTER.SCP | contest callsign list (Super Check Partial): goes in the program folder | supercheckpartial.com |
| IK2ANE repeater list | Italian repeaters to import into the memory bank (pontixls.xls file) | ik2ane.it |
| VB-Cable | virtual audio cable: FZR SDR audio to WSJT-X or other programs | vb-audio.com/Cable |
| WSJT-X | FT8/FT4 decoding with the DIGI mode audio | wsjtx.sourceforge.io |
💾 Installation
With the installer (recommended)
- Download FZRSDR_Setup and run
FZRSDR_Setup_2.9.2.exe. No administrator rights needed: the program goes into%LOCALAPPDATA%\Programs\FZR SDR(if you choose «all users» it goes into Program Files, and settings, log and licence are then kept in%APPDATA%\FZRSDR). - The setup copies
perseususb.dlland the Perseus.sbsfiles from CW Skimmer, the Perseus software or HDSDR by itself, plus the callsign list (N1MM MASTER.SCP or CW Skimmer MASTER.DTA). If you install the Perseus software later: Start menu → FZR SDR → Copy the Perseus files. - It adds desktop and Start menu icons; uninstall from Settings → Apps.
- Where the folder is: it is hidden in AppData. Press Win+R, type
%LOCALAPPDATA%\Programs\FZR SDRand Enter:fzrsdr.json,fzrsdr.log, thertlfolder and the recordings are there. Or Start menu → right click on FZR SDR → Open file location. If you installed «for all users», the program is inC:\Program Files\FZR SDRand settings, log and recordings in%APPDATA%\FZRSDR. - To update, just run the new setup: it closes FZR SDR and leaves settings, memories, licence and recordings alone.
- Coming from FZR Skimmer: the setup updates the old installation in its own folder, which stays
Programs\FZR Skimmer(licence and settings are there), and deletesFZRSkimmer.exeand the «FZR Skimmer» icons. Always start FZR SDR: the version is shown at the top, next to the name. If the log says «FZR Skimmer 1.83» you are still running the old exe: delete it and run the setup again (do not just copy the new exe by hand). - Coming from the zip: to keep settings and memories, copy
fzrsdr.jsonfrom the old folder into the new one, with the program closed. - Windows may show the SmartScreen warning (unsigned program): More info → Run anyway.
With the zip
- Download the FZRSDR zip and unpack it anywhere, for example in
C:\FZRSDR. - No CW Skimmer or Perseus software? Install the USB driver from the Microtelecom driver package (if Windows does not already recognise the Perseus), then download the ExtIO Perseus 2.4a package and copy
perseususb.dlland all theperseus*.sbsfiles into the FZR SDR folder, next to FZRSDR.exe. You can then skip the next step. - Run prepara_cartella.bat once: it copies the Perseus files into the folder from CW Skimmer, HDSDR or the Perseus software, and the
MASTER.SCPcallsign list from N1MM if present. If you skip it, FZR SDR looks for those files in the CW Skimmer folders anyway. - Close CW Skimmer, HDSDR and the Perseus software: only one program at a time can use the Perseus.
- Start FZRSDR.exe: the program window opens. The interface is in English or Italian (EN/IT button at the top right).
All settings (band, DX, memories, filter, sensitivity, colours, receiver, mode, language) are saved automatically in fzrsdr.json next to the exe. The program log is fzrsdr.log, in the same folder: it is the first file to look at if something goes wrong.
🔑 Registration and free trial
FZR SDR uses the same registration as ADIF FZR: same callsign, same key. If ADIF FZR is already registered on the same PC, FZR SDR finds the licence by itself and asks nothing.
- Unregistered, the receiver runs 30 minutes per start, then stops and the registration window appears.
- Playback of recordings is always free.
- Register button at the top: type your callsign and paste the key you received. There is no automatic activation: the key must always be pasted, even if it is the same as ADIF FZR.
- Request a key opens the request page on iw1fzr.it; or fill in the form below. Registration is free and the same key works for ADIF FZR.
🔑 Request your registration key
Registration is free and one key works for both ADIF FZR and FZR Skimmer. Without a key ADIF FZR runs a 30-day trial, FZR Skimmer 5 minutes per start. Donors get a ♥ next to their call. Fill in and send: you will receive the key by email.
📻 Receivers
The receiver is chosen in ⚙ Settings → Receiver, without restarting the program.
| Receiver | When to use it | What to set |
|---|---|---|
| Perseus | The best way: you see and decode up to 96 kHz of band (48 kHz is enough for almost every pile-up). | Perseus centre kHz, Sample rate. If stations appear mirrored, tick Swap I/Q. |
| Radio audio | Any radio: its audio output goes into the PC sound card (for example the IC-7600 USB Audio CODEC). Only the radio passband, 2–3 kHz, is seen. | Input, Radio frequency kHz (the one shown by the radio), Offset: the CW pitch, e.g. 600, if the radio shows the signal frequency like Icom in CW; 0 if it shows the carrier. |
| IQ from sound card | Receivers sending I and Q on the left and right channels (SoftRock and similar). | Input, LO kHz (centre frequency), Sample rate. |
| ExtIO (SDRplay, Airspy HF+…) experimental | Any receiver with a 32-bit HDSDR ExtIO plugin: SDRplay RSP1A/RSPdx/RSPduo, Airspy HF+ / Discovery, FunCube and others. If the receiver works in HDSDR, it works here. The receiver driver must be installed (for SDRplay, the SDRplay API). | Plugin: the program looks for it in the HDSDR, SDRplay and Airspy folders and in its own; otherwise Browse… and pick the ExtIO_….dll file. Sample rate: the list comes from the plugin, choose 192 kHz or less; if the receiver only offers high rates (SDRplay at 2 MHz) the program reduces them below 200 kHz by itself (÷ n next to the value). Receiver settings opens the plugin window (gain, antenna, AGC). Centre kHz. |
| RTL-SDR (dongle) | VHF/UHF (24 MHz – 1.7 GHz), FM and AM; shortwave too with direct sampling. Works without a Perseus. | WinUSB driver (Zadig). See RTL-SDR dongle. |
| ADALM-Pluto | VHF/UHF/SHF by USB or network (unlocked firmware: 46.9 MHz to 6 GHz); QO-100 with an LNB. | PlutoSDR driver for USB. See ADALM-Pluto. |
| SpyServer (network) | Someone else’s Airspy HF+, Airspy R2/Mini or RTL-SDR dongle, over the Internet. | Just the address. See SpyServer. |
| KiwiSDR (network) | Someone else’s KiwiSDR (0–30 MHz) over the Internet: a ±5 kHz slice. | Just the address. See KiwiSDR. |
| Recording (WAV) | Play back an IQ recording. | See Recording and playback. |
If the receiver does not start, press Restart receiver: it closes and reopens the Perseus without closing the program (a couple of seconds of silence; settings are kept). The program already retries 3 times by itself at start-up.
↑ Back to top🎛️ Radio (CAT) with Hamlib
FZR SDR controls the radio (IC-7600 and every radio Hamlib supports) alongside the Perseus: radio and waterfall follow each other. It does so through rigctld, the small Hamlib program also used by WSJT-X and many loggers.
- Install Hamlib for Windows from the official page (the
hamlib-w32-….exeor-w64file, either works). FZR SDR findsrigctld.exeby itself in the Hamlib, WSJT-X and JTDX folders; otherwise Browse…. - In ⚙ Settings → Network and radio press Radio…: choose the model (type «7600» to find 3063 · Icom IC-7600), the COM port and the speed (IC-7600: CI-V over USB, 19200), then Connect the radio.
- If another program has already started rigctld, choose Connect to an rigctld already running and give computer and port (usually 4532): the radio is then shared.
- The Radio (CAT) tick (in ⚙ Settings → Network and radio) turns the link on and off; next to it you see the frequency read from the radio, the mode and the split TX.
| What it does | How |
|---|---|
| The radio follows FZR SDR | DX (Ctrl+click, wheel, typed frequency), band buttons, mode: CW, or USB/LSB in SSB. |
| FZR SDR follows the radio | Turn the dial: the DX (or RX) moves; leave the received band and the Perseus retunes. With Radio audio the frequency is read automatically. |
| Split in SSB | The radio TX follows VFO B: spin the wheel, find who answers, and the TX is already there. TX = VFO B button or T key. |
| Split in DXpedition | TX → listening or the T key: TX on the last listening spot found. |
| Split anywhere | Right click on the waterfall → TX here (split). |
| On the waterfall | The dashed red line is the radio TX, with its offset from the DX. |
| While you transmit | The audio of your own signal is muted and reception is back as soon as you stop, in about 20 ms: no deafness after transmitting simplex. It knows from the radio PTT (read 10 times a second) and, even without CAT, from your signal flooding the band; during TX the AGC stays at its previous level. |
🎯 Frequency calibration
If the receiver reads slightly off the true frequency (the Perseus sometimes by a few tens of Hz), correct it with Correction ppm, in ⚙ Settings → Frequency. The error comes from the receiver crystal and is proportional to frequency: that is why it is set in ppm (parts per million) and a single correction works on every band. 1 ppm is 7 Hz at 7 MHz, 14 Hz at 14 MHz, 28 Hz at 28 MHz.
The easy way is the Calibrate… button, which runs a test on a standard-frequency station:
- Pick a station you hear well right now: RWM 4996 / 9996 / 14996 kHz, WWV and BPM 5 / 10 / 15 MHz, CHU 3330 / 7850 / 14670 kHz. From Europe RWM and the 10 or 15 MHz carriers usually work well.
- Press Measure: the program tunes to the station (the carrier goes into the DX audio, you can hear it), measures it for 6 seconds to a hundredth of a Hz and goes back where you were, with the same DX.
- The current error in Hz, the signal strength, the stability and the measured correction in ppm are shown.
- If it looks good press Apply the correction. It is never applied by itself: you decide.
- To check, measure a second station on another frequency: it should say “The receiver is already accurate”.
| Message | What to do |
|---|---|
| Signal too weak | Try another station or another frequency of the same one (it changes with the time of day). |
| Unstable measurement | Retry: strong fading or two stations on the same frequency (WWV and BPM are both on 5, 10, 15 MHz). |
With a signal of known frequency (RTL-SDR dongle)
On VHF/UHF the dongle cannot hear the standard stations. In the Calibrate… window, below the list, type the exact frequency of a signal you know and hear well: a repeater output while it is transmitting (e.g. 145.6 or 145600) or a beacon. Then Measure and Apply the correction, as above. With the dongle the search reaches ±150 ppm and skips the fixed spike in the middle of the waterfall.
🖥️ The screen
[Image: the screen with numbered parts]
- Top: visible part of the band, last listening spot found, licence status, EN/IT language button and Quit.
- Mode (DXpedition / Contest) and Band: the 160…10 buttons (60 m included) recall the centre and DX stored for that band; Save memory stores the current ones.
- Radio panel: VFO A (and VFO B) with frequency, S-meter, mute and volume, then Audio and Receiver (AGC, filter…): see below.
- Waterfall controls: ▲/▼ 5 kHz, Back to DX, Span of the view (from 1.5 kHz to the whole band), Sensitivity, Colours/Brightness/Contrast, History (5, 10 or 20 seconds).
- Waterfall on the left: time runs from left to right (newest signals on the right), frequency is vertical with the scale on the right. The green stripe is the RX passband on the DX.
- Decoded text on the right, level with each signal. 5NN/599/TU on an orange background; sure callsigns in white on blue; callsigns corrected by the program marked with ? and a dashed underline.
- DX line below the waterfall: everything the DX sends, in sequence.
- Bottom: DX kHz, UP zone, Centre kHz, the ⚙ Settings button and the status line with the 📡 RBN, 🎛️ radio and 🔒 beacon-lock pills (green when fine, yellow on a problem).
⚙ Settings panel
Settings you rarely touch live in a tabbed panel on the right; open it with ⚙ Settings at the bottom, close it with Esc or ✕; it remembers the last tab.
- Receiver: which receiver (Perseus, radio audio, IQ, ExtIO, RTL-SDR dongle, ADALM-Pluto, SpyServer, KiwiSDR) and its settings, Restart receiver.
- Frequency: converter and LO, beacon lock, ppm correction, Calibrate….
- Network and radio: RBN with the callsign, Radio (CAT), Radio….
- Appearance: waterfall colours, brightness and contrast, display colour; Needle (amber needle S-meter), ☀️ Light (light theme for daytime: waterfall and displays stay dark), Plan (band plan on the scale), 📌 Memories (memories on the waterfall), Spectrum.
- General: «Mode change → mode memory» and how many minutes to keep for «Save last».
Spectrum, band plan and memories on the waterfall
- Spectrum: the strip between waterfall and scale shows the signal level right now (blue) and the peaks of the last seconds (gold), with the VFO A and VFO B lines.
- Band plan: the coloured strip on the edge of the scale (IARU Region 1, indicative): purple CW, orange digital, green phone, red beacons, blue FM and repeaters, cyan satellites; the QO-100 slice too.
- 📌 Memories: memory bank entries inside the view appear as gold pins with their name; click a pin to go to that memory.
- View span: each mode remembers its own; by default FM and AM 30 kHz, SSB and DIGI 6 kHz, CW and RTTY 3 kHz.
- ⛶ next to the span: full screen (Esc to exit), handy on a second monitor or a tablet.
| Sensitivity | Effect |
|---|---|
| High | more weak callsigns, but more errors |
| Medium | the recommended starting point |
| Low | clean signals only |
Radio panel
Below the modes there is a radio-style panel, with one box per receiver and its controls next to it.
- SPLIT (Receiver modes, S key): on = VFO B active; off = VFO A only, like a radio without split: the VFO B box disappears, the wheel and clicks on the waterfall move VFO A and, with the radio connected, the radio split is turned off.
- When only one receiver is on (split off, or VFO A or VFO B muted) you hear it in both ears.
- VFO A (green edge): the big frequency, mode and filter, the S-meter, 🔊 VFO A (on = audible, off = muted, M key) and its VOL. Wheel on the frequency: moves the DX by the VFO A Step (10 Hz to 1 kHz, one per Receiver mode: 100 Hz in SSB and DIGI, 50 Hz in CW and RTTY by default; also used by Ctrl + wheel, arrows and the wheel with split off; Shift 10 Hz; 🔒 DX blocks it). Digits as keys: click the upper half of a digit = +1 on that digit, the lower half = −1 (on 14.074, above the 0 of the tens of kHz you go to 14.084); hovering lights the digit and a small bar shows which half. Wheel over a digit: changes that digit. Click «MHz» or press a number key (with the VFO selected): type the frequency in kHz (
14195) or MHz (14.195), Enter confirms, Esc cancels; a typed frequency also moves the centre. Works on VFO B too. - VFO B (blue edge, Receiver modes): frequency, UP/DOWN offset from the DX, S-meter, 🔊 VFO B (R key) and its VOL, the wheel Step, VFO B = DX and, with the radio connected, TX = VFO B. Wheel and click on the frequency as for VFO A.
- Audio: Volume (turns on the PC audio), AF (master volume), headphones (DX left, right or together), 🎧 Test and the recording buttons (💾 Save last, ⏺ Record, 📂).
- Receiver: AGC and RF, ATT and PRE, filter (CW or SSB) and sideband.
- In the Skimmer modes (Normal, DXpedition, Contest) the panel fits on one line, so the waterfall stays tall. In the Receiver modes the ▴ button shrinks it to the two frequencies only (▾ opens it again): M and R keys and the wheel still work.
- The two VOL sliders (double click = normal) set DX and VFO B levels independently.
DSP: NB, NR, NOTCH and display colours
In the Receiver box, DSP row. NB and NR have three levels: each click goes up one (1, 2, 3, then off), right click turns them off.
- NB (noise blanker, B key): removes impulses (static crashes, motors, electric fences) before the filter, like a radio noise blanker. Higher levels remove weaker impulses too.
- NR (noise reduction, N key): lowers the hiss between words and between CW elements. Level 1 light, 3 strong (at 3 the voice gets a little «metallic»). Works on VFO A and VFO B and in the Skimmer modes too.
- NOTCH (SSB only): automatically kills steady carriers (tuners, heterodynes) lasting more than a second.
- NB, NR and NOTCH are remembered. NR adds a fixed 32 ms delay, even when off, the same for VFO A and VFO B.
- Display (in ⚙ Settings → Appearance, next to Colours, Brightness and Contrast): the radio panel colour, i.e. frequencies, S-meters and sliders: night, amber, green, blue or red.
Radio controls: AGC, RF, AF, ATT, PRE, SSB filter
- AGC: FAST for pile-ups and signals that come and go, MED, SLOW for relaxed listening (the default), or OFF: fixed gain set with the RF slider (lower it if strong signals distort).
- AF: the volume; double click brings it back to normal.
- ATT 0/10/20/30 dB and PRE (preamplifier): shown only with the Perseus. The S-meter accounts for the attenuator and keeps reading the signal at the antenna.
- SSB filter from 1.8 to 3.3 kHz (SSB only): the passband always starts at 200 Hz.
S-meter
The radio panel holds the DX S-meter (VFO A); in the Receiver modes also the VFO B one. It measures the signal in the RX passband, like a radio: S9 = −73 dBm, 6 dB per S unit, then S9+10 up to S9+60. The bar rises at once and falls slowly; the white tick is the peak of the last 2 seconds.
- Needle: in ⚙ Settings → Appearance the Needle button turns it into a backlit amber meter like classic radios, with the red peak dot and the S and dBm reading below. The needle has a little inertia: quick up, slower down.
- Until it is calibrated, dBm values carry a ≈ (approximate).
- With an uncalibrated RTL-SDR dongle the reference is the channel noise floor, about S3 on VHF (−174 dBm/Hz plus the filter width and a 6 dB noise figure): its sample level changes with the gain, so a fixed value would always read S9++. For true readings calibrate it like the other receivers.
- Click the S-meter → Set: put the DX on a steady signal and pick its strength (e.g. S9).
- Or with the radio (CAT, same frequency as the DX, steady signal such as a carrier or a broadcast), in two steps because with an antenna relay the Perseus and the radio do not receive together: 1 · Measure here with the relay on the Perseus, then switch the relay off (antenna to the radio) and 2 · Read the radio. With separate antennas or a splitter just press the two buttons one after the other.
- The calibration is remembered per receiver (Perseus, ExtIO, sound card); Reset removes it.
👂 Normal mode (free listening)
The mode for listening to the band as with CW Skimmer. Choose Normal at the top left.
- The Decoded text panel opens on the right: one row per signal visible in the waterfall, top to bottom, with the frequency and the text of the last 3 minutes.
- Highlighted: callsigns (boxed; sure ones white on blue, those corrected by the program with ?), CQ in green, 599/5NN/TU on orange.
- The same highlighting is used in the column next to the waterfall.
- Click a row: the RX moves to that signal (with Volume on you hear it).
- Rows with a single fragment and no callsign are hidden; rows idle for more than a minute are dimmed.
- The ☰ List button shows or hides the panel. The listening search is off.
🌍 DXpedition mode (split pile-ups)
This is what FZR SDR was born for. A typical setup: the radio relay switches on transmit and the Perseus receives; the audio stays locked on the DX while you scroll the waterfall to see where the pile-up is calling and where the worked station answers.
- Set the DX: Ctrl + click on its signal in the waterfall, or type the frequency in DX kHz (in kHz, e.g.
14025.5, or MHz, e.g.145.5or7.074; Enter: if it is outside the view the receiver moves by itself; Centre kHz works the same way), or right click → Set DX here. To fine-tune it: Ctrl + wheel (50 Hz, with Shift 10 Hz) or the left/right arrows. - UP zone: where to look for the listening frequency, in kHz above the DX. If the DX says “UP 1-5”, type 1 and 5. It also keeps FT8 and other digital signals out.
- Listening spot: after every 5NN from the DX the program looks at who answers right after and draws an orange line on that frequency, with the offset from the DX. The latest ones stay as buttons under Listening: one click centres the waterfall there.
- If the listening spot is outside the view, an orange button appears at the top or bottom of the waterfall: click it to go there.
🏆 Contest mode (S&P)
With Mode → Contest the station list opens and the listening search is switched off. The list can also be opened and closed by hand with ☰ List.
- Stations are sorted by frequency, with callsign, a CQ tag if they are calling CQ or TEST, frequency, dB, speed and how long ago they were heard.
- The list contains confirmed callsigns (decoded the same at least twice on the same signal, or right after CQ/TEST) and the RBN spots in the received band, in purple.
- Click a row: the audio goes to that station and the waterfall centres on it.
[Image: Contest mode with the station list]
↑ Back to top🎙️ SSB mode (phone pile-ups)
For fierce phone pile-ups. The first receiver stays locked on the DX; a second receiver, VFO B, moves very fast with the mouse wheel to find who is answering. Choose SSB at the top left.
- Stereo audio: DX in one ear and VFO B in the other (menu DX left · VFO B right, the reverse, or together). Each has its own VOL in the radio panel, next to its mute (double click = normal).
- Mouse wheel on the waterfall: VFO B goes up or down by the chosen Step, 100, 500 or 1000 Hz, snapped to the grid (14200.0, 14200.5…). Shift + wheel scrolls the view, Ctrl + wheel moves the DX.
- Click on a voice in the waterfall: VFO B goes there, with the passband centred where you click. Ctrl + click does the same for the DX. VFO B = DX brings VFO B back to the DX.
- Sideband Auto (LSB below 10 MHz, USB above and on 60 m, as usual) or fixed; 2.7 kHz filter (200–2900 Hz) with steep skirts, to keep neighbours out.
- On the waterfall: DX passband in green, VFO B in light blue with its offset (e.g. VFO B +5.30); the right column shows both frequencies and the step.
- DX and VFO B frequencies are carrier frequencies, as on the radio. The VFO B offset is stored relative to the DX: it stays, for example UP 5, when you change band.
- Phone band memories: switching to SSB the receiver moves to the phone segment of the same band (40 m: centre 7150, DX 7140; 20 m: 14220 / 14195; 80 m: 3780 / 3790…); back to CW the CW memories return. Save memory in SSB saves the phone one. 30 m is not shown in SSB.
- Ctrl + wheel and Ctrl + click move only the DX: VFO B stays where it is and the offset changes. Changing band, VFO B keeps its offset instead (e.g. UP 5).
- 🔊 VFO A DX (M key) and 🔊 VFO B (R key) work the same way: on (lit) = audible, off (🔇) = muted. VFO B off also disappears from the waterfall and comes back as soon as you spin the wheel.
- 🔒 DX (off by default): when on, Ctrl + wheel and arrows cannot move the DX by mistake; Ctrl + click, right click, typing and band buttons can.
- 🎧 Test: a low note in the DX ear and a high note in the VFO B ear. If both sound the same, the problem is outside the program: mono headphones, sound card, mixer, or Windows with Mono audio on (Settings → Accessibility → Audio).
📟 Receiver: CW, RTTY, DIGI
Besides SSB, the Receiver row has CW, RTTY and DIGI: a pure receiver (in RTTY with the FZRTTY skimmer, see below), with everything SSB has (VFO A on the DX, VFO B on the wheel, stereo, 🔊 VFO A / 🔊 VFO B, split following VFO B, S-meter) and its own band memories.
| Mode | Frequency | Passband | Memories |
|---|---|---|---|
| CW | the signal frequency, heard at 600 Hz | RX filter 100–800 Hz | the same as the CW skimmer |
| SSB | carrier (as on the radio) | 2.7 kHz, USB or LSB | phone: 7140, 14195… |
| RTTY (FZRTTY skimmer optional; TX on QO-100) | mark (like Icom), 170 Hz shift | 600 Hz: mark 2125 Hz, space 2295 Hz | 7040, 14083, 21083… |
| DIGI (FT8, FT4, PSK…) | USB-D dial | 100–3100 Hz | FT8 frequencies: 7074, 14074, 21074… |
- The wheel also has 10 and 50 Hz steps, handy in CW and RTTY.
- With the radio connected (CAT) the radio mode follows: CW, USB/LSB, RTTY, USB-D for DIGI.
- DIGI with WSJT-X (or another digital program): in Windows (Settings → System → Sound → Volume mixer) send the Edge audio («FZR SDR») to a virtual audio cable (e.g. VB-Cable) and pick that cable as WSJT-X input. Headphones DX and VFO B together and VFO B off (🔇 VFO B).
⌨️ RTTY: the FZRTTY skimmer
In RTTY mode FZRTTY is at work: a multi-channel RTTY skimmer built for contests. It finds every RTTY signal you see in the waterfall by itself and decodes them all at once, like the CW skimmer.
- Amateur RTTY: 45.45 baud, 170 Hz shift, Baudot with letters/figures shift and «unshift on space». A signal frequency is its mark (the upper line), as on Icom radios.
- Each signal text appears next to the waterfall, level with its mark, with callsigns, CQ and 599 highlighted; a «TOO» (599 with the figures shift lost) becomes 599.
- The station list opens by itself: for each signal the callsign it repeats most (not yours, which shows up when it answers you), with frequency and strength. Click = VFO A on that station.
- The bottom line shows the DX (VFO A) text; in the headphones you have VFO A and VFO B as in the other modes, with mark at 2125 Hz and space at 2295 Hz: the audio can also go to MMTTY through a virtual audio cable.
- A new signal is decoded again from the last 3 seconds, so you do not lose the callsign sent at the start. Line pairs that do not alternate (carriers, two close CW signals) are discarded, and a channel that gives only broken characters disappears by itself.
- RTTY memories: mark at 7040, 14083, 21083… with the centre 15 kHz above, so the whole RTTY segment is in the waterfall. With «Span» 30 or All you see more stations at once.
🛰️ RTL-SDR dongle, VHF/UHF, FM and AM
FZR SDR also works without a Perseus, with a cheap RTL-SDR dongle (RTL-SDR Blog V3/V4, Nooelec and similar): from 24 MHz to 1.7 GHz, i.e. 10 m, 6 m, 2 m, 70 cm and 23 cm, plus airband, marine, PMR446, satellites. With the V3/V4 direct sampling shortwave too, with less dynamic range than the Perseus.
- Driver: the dongle needs the WinUSB driver installed with Zadig (the same one SDR# needs). If SDR# or SDR++ already see it, it is fine.
- rtl_tcp: FZR SDR talks to the dongle through
rtl_tcp.exe, found in the programrtlsubfolder and started automatically. So a dongle on another computer works too (a Raspberry near the antenna, for example): startrtl_tcp -a 0.0.0.0there and type its address in the rtl_tcp box (e.g.192.168.1.50:1234). - First start: with no Perseus but a dongle, FZR SDR starts with the dongle, FM on 2 m. Otherwise: ⚙ Settings → Receiver → RTL-SDR (dongle) (with ✓ when the PC sees it).
- Settings (bottom): Gain (Auto or manual; lower it if ghost signals appear), HF (direct sampling for shortwave with V3/V4, Q branch), Bias-T (powers an LNA or upconverter through the cable), Chip AGC. The Gain menu shows the real steps of the dongle tuner (R820T, E4000, FC0012/13). The dongle receives 192 kHz at a time; the crystal error is corrected with Calibrate… on a repeater or beacon (see Calibration) or by typing it in Correction ppm.
- Smoothness: rtl_tcp sends data in packets; FZR SDR runs at 1.92 MS/s (one packet every 68 ms) and scrolls the waterfall at a steady speed. The audio is about 0.3 s late, the price for having no gaps. If the PC falls more than 1.5 s behind, the program skips ahead and is back in real time.
- Bands: the buttons become 10, 6, 2, 70cm, 23cm (shortwave ones with direct sampling). Each band remembers its memory for every mode, as on HF.
ADALM-Pluto
Instead of the dongle you can use an Analog Devices ADALM-Pluto: ⚙ Settings → Receiver → ADALM-Pluto. FZR SDR talks to the server running inside the Pluto (iiod), so there is no libiio to install on the PC.
- By USB: install the Analog Devices «PlutoSDR» driver (see Download); over USB the Pluto is also a network adapter and answers at
192.168.2.1, the default address. - On the network (LAN, with an Ethernet adapter or behind another PC): type its IP or
pluto.localin the Address box. - Gain: Auto (chip AGC) or fixed from 0 to 70 dB.
- Frequencies: with the standard firmware the chip (AD9363) covers 325 to 3800 MHz, i.e. 70 cm and 23 cm. For 2 m (and 6 m) you need the firmware «unlocked» as AD9364: 70 MHz to 6 GHz, and in practice the receiver goes down to 46.9 MHz, with less sensitivity below 70 MHz: from the Pluto terminal
fw_setenv attr_name compatible,fw_setenv attr_val ad9364, thenreboot. - Wide waterfall: next to the main waterfall, the spectrum of the whole band the Pluto receives (288 kHz, 576 kHz, 1.15 or 1.7 MHz; choose it in Wide waterfall or with − and + / wheel). With QO-100 it centres itself on the whole transponder (10489.5–10490 MHz, beacons included), like SDR Console; the white box is the slice you are listening to. Click a signal = go there.
- The Pluto runs at 2.304 MS/s and FZR SDR keeps 192 kHz of it, as with the dongle. Its stock crystal is a few tens of ppm off (up to 10 kHz at 435 MHz): calibrate it on a repeater with Calibrate…. With a TCXO fitted the error is 1 ppm or less.
SpyServer (network receivers)
⚙ Settings → Receiver → SpyServer (network) connects to an Airspy SpyServer: an Airspy HF+, Airspy R2/Mini or RTL-SDR dongle shared on the network, even on the other side of the world. It works like a local receiver: CW skimmer, waterfall, VFO A/B, split, memories, calibration; band and frequency move the remote receiver.
- In Server type or paste the address with the port (e.g.
sdr.example.com:5555; thesdr://…link works too) and press Enter. Servers you used stay in the box list (the last 12). - 🌐 Find servers (Airspy list) opens the list of public servers on the Airspy site.
- The program recognises the receiver and asks for the chosen band; only the bands that receiver reaches are shown. Gain appears if the receiver has it and nobody else is controlling it: on a shared server, if someone else controls it, you can only move inside the band it is receiving.
- Band (48, 96 or 192 kHz) and Data (8 or 16 bit) set how much data you ask of the server: 192 kHz at 16 bit is about 6 Mbit/s, 96 kHz at 8 bit 1.5 Mbit/s, 48 kHz at 8 bit under 1 Mbit/s. If audio and waterfall hiccup the server cannot keep up: lower the band or switch to 8 bit. Next to it is the Mbit/s estimate; the status bar shows the samples actually arriving.
- Data from the Internet is less regular: the audio has more headroom (about 0.4 s, growing by itself if the buffer runs dry). Public servers often have few slots and a time limit: use them politely.
KiwiSDR (network receivers)
⚙ Settings → Receiver → KiwiSDR (network) connects to a KiwiSDR: the 0–30 MHz receivers that many hams share on the Internet. The Kiwi gives each user a slice of about ±5 kHz (12 kHz of IQ): the waterfall is narrow, but CW skimmer, VFO A/B, split, SSB, AM, memories and bands work as with a local receiver. Band, memories and a typed frequency move the slice; the DX sits a fifth below the centre, with room above for the split.
- In Kiwi type or paste the address with the port (e.g.
kiwi.example.com:8073; the link copied from the browser bar works too) and press Enter. Kiwis you used stay in the box list (the last 12). - 🌐 Find Kiwis (map) opens the map of public KiwiSDRs (rx.linkfanel.net), 🌐 Find Kiwis (list) the list on the KiwiSDR site: open the one you want and copy its address.
- Wide waterfall: on the left the Kiwi waterfall appears over 30–120 kHz (and more), with a box for the received slice and the green DX line. Click a signal: the slice and the DX move there. −/+ or the wheel change the width. There you see the pile-up; decoding and audio stay inside the slice.
- Gain: Auto uses the Kiwi AGC; for the skimmer a fixed gain (0 to 120 dB) keeps the noise floor steady when a big signal passes. Password only for protected Kiwis.
- Each connection takes one Kiwi channel: if they are all busy the program says so. Many public Kiwis have a time limit: use them politely.
QO-100 and converters
In ⚙ Settings → Frequency, Converter tells the program what sits in front of the receiver, so the frequencies shown, the memories and the bands are the real ones.
- QO-100 (LNB 9750 MHz): with the Pluto or the dongle behind an LNB (10489.5 MHz → 739.5 MHz). A QO-100 band button appears: in the skimmers (Normal, DXpedition, Contest) the centre goes to the CW slice (10489.505–540) with the lower beacon in view; in SSB to the phone part (10489.650–990); in DIGI to 10489.540. The memory bank has a QO-100 (con LNB) group with the three beacons.
- Type real frequencies:
10489.525(MHz) or10489525(kHz). - The LNB is off frequency (from a few Hz with a GPS reference to tens of kHz without): Calibrate…, type
10489.5(lower beacon) and Measure. With a converter the correction goes on its oscillator (LO MHz, to the Hz), not on the receiver ppm. It can also be typed by hand in LO MHz. - Beacon lock (shown with the converter on): the LNB drifts with temperature. With the box ticked, every half second the program looks for the beacon in the received band (the lower CW one, 10489.500, in the skimmers; the middle PSK one, 10489.750, in SSB) and corrects the oscillator by itself: frequencies stay the real ones and the VFO stays on the station. Next to it you see the locked beacon and how much it was moving; ⚠ means the beacon is not in the received band or is too weak. At the start it searches within ±40 kHz (a common LNB can be 30 kHz off), then follows it closely; LO MHz shows the real LNB oscillator, which stays saved. It corrects by retuning the receiver a few Hz: centre, VFOs, filters and decoding are untouched, so no gaps in the audio.
- With the Pluto the lock is careful: it follows the LNB in small steps (25 Hz at most each time), a big jump must be confirmed before it is taken, and it does not mistake a station for the beacon. If it loses the beacon for a few seconds it runs the three-beacon search over the whole 2.3 MHz again by itself. It pauses while you transmit and resumes 1.5 s later.
- other…: any converter or transverter; type the oscillator in MHz (negative for an upconverter, e.g.
-125for a 125 MHz upconverter in front of the dongle). - The converter is stored per receiver; none removes it.
QO-100: guided setup and settings (Pluto)
With the ADALM-Pluto the QO-100 setup is guided: ⚙ Settings → Frequency → 🛰 QO-100 (also from the 🛰 QO-100 button in the TX bar). The window has two tabs: Guided setup, the three steps below, and Settings, with every QO-100 setting on one page (LNB oscillator, beacon lock, TX, PWR, TX correction, XIT, Track my echo, full duplex, Swap I/Q, CW speed, SSB microphone and processor, RTTY skimmer). If the LNB is already set up it opens straight on Settings.
- 1 · Reception: Set up sets the QO-100 converter (LNB 9750 MHz) and goes to the CW slice with the beacons in view.
- 2 · Correct the LNB: Find the beacons looks for the three beacons together (lower CW, PSK, upper CW: their spacing is fixed) across the Pluto’s whole 2.3 MHz and tells you how far off the LNB oscillator is, even by hundreds of kHz. Confirm with Correct and lock (always shown, even when the error is small): from then on the beacon lock refines to the Hz and follows the drift.
- 3 · Align the TX: Switch TX on, Free spot moves VFO A to a free spot in the CW slice, then Calibrate TX measures the Pluto crystal error by itself: it sends «VVV VVV VVV» at 18 WPM and recognises your echo by the rhythm of the keying, within ±40 kHz, so it does not confuse it with other stations. If it cannot find it with the saved correction (correction way off), it tries again from zero. Reset correction sets the TX correction back to 0. Otherwise Carrier + Sync: an 8 s carrier and you click your echo on the waterfall.
- After this you transmit exactly where the VFO A line is; Track my echo keeps it aligned while the Pluto warms up and XIT lets you fine-tune by ear (see TX/RX sync).
Transmitting CW on QO-100 (Pluto)
With the Pluto behind the LNB (QO-100 converter) the red TX QO-100 bar appears: the Pluto sends CW on the 2400 MHz uplink while you receive the 10489 MHz downlink, and your signal comes back from the satellite on the waterfall (about 0.27 s later), decoded by the skimmer like the others.
- You need an amplifier with a filter: the Pluto alone gives a few milliwatts and has harmonics. Start with low PWR (−30 dB) and raise it slowly while watching your signal on the downlink: it must not exceed the beacon.
- ⏻ TX enables transmission. The uplink frequency follows VFO A (VFO B with SPLIT, see below): downlink − 8089.5 MHz plus the TX correction and XIT. It also follows while you transmit: turn the knob and the uplink moves with you. Outside the transponder or within 4 kHz of a beacon the program does not transmit, and if you get there turning the knob it stops.
- Click on a CW station: VFO A goes onto its carrier, to the Hz (it searches within ±80 Hz of the click). In the log: «VFO A on the station: … (−40 Hz from the click)». So you transmit exactly on its frequency.
- F1–F6 (buttons or keys) send the macros; type text in the box and press Enter. ■ STOP or Esc stop at once. Speed in WPM. Macros are edited in ⚙ Settings → Frequency:
{CALL}is your callsign,{DX}the other station’s (see below), prosigns are written<SK>,<AR>,<KN>. - His call (2.9.2): the box in the TX bar, before the macros, holds the other station’s callsign and replaces
{DX}in the macros. To fill it, click its callsign in the RX line at the bottom (it flashes yellow), or type it. It stays until you change it. A macro with{DX}and an empty box does not start: the program tells you. - Calibrate TX: the Pluto crystal is a few ppm off, i.e. a few kHz at 2.4 GHz. Put VFO A on a free spot of the CW segment and press it: the program sends «VVV VVV VVV», recognises your echo on the downlink by the rhythm of the keying and corrects the uplink by itself. Then your signal lands exactly where you click. Best with beacon lock on.
- Full duplex (on): you keep listening while transmitting and hear your signal come back from the satellite. Off = half duplex: audio is muted while transmitting.
- Carrier: 5 s of carrier to adjust the amplifier. If your signal does not show on the downlink, try Swap I/Q (⚙ Settings → Frequency).
- CW uses the Pluto tone generator (+500 kHz from the oscillator): residual carrier and image fall below 2400 MHz, outside the transponder. Keying has a ramp of a few milliseconds (no clicks). The TX oscillator is on only while transmitting.
Transmitting SSB on QO-100 (Pluto)
In SSB mode the TX bar shows 🎤 PTT instead of the CW macros: click to transmit USB where VFO A is, click again (or Esc, or ■ STOP) to go back to receive. PTT switches off by itself after 5 minutes. If you turn the knob while talking, the uplink follows the VFO.
- In ⚙ Settings → Frequency choose the Microphone and set Mic gain: speaking normally the MIC bar should reach the yellow.
- Processor (0–20 dB, 0 = off): lifts the weak parts of the voice and clips the peaks of the finished SSB signal, like the RF processor in radios: more average power for the same peak, with spurs below −75 dB. 8–12 dB for normal use; off for digital modes. Next to the MIC bar you see how much it works.
- 5-band Equalizer (200, 400, 800, 1600, 2600 Hz, ±12 dB; double click = 0) with three presets: Flat, DX (less bass, more treble, cuts through the noise) and Warm (a full voice for ragchews).
- Voice test (5 s): records five seconds from the microphone without transmitting and plays them back; it also tells you if the gain is too high or too low. ▶ Original and ▶ Processed can be replayed as often as you like: adjust processor and equalizer and hear the difference on the same sentence at once. Settings apply immediately, even while transmitting.
- The voice goes through a 300–2700 Hz filter that makes the upper sideband by itself; the signal is +500 kHz from the oscillator like CW (residual carrier and image outside the transponder) and spurs are below −75 dB.
- The Pluto receives and transmits together (2.3 million samples per second each way): with Full duplex you hear yourself come back from the satellite. Before the first use run Streaming test (⚙ Settings → Frequency): it must say OK.
Aligning TX and RX: TX/RX sync
Your signal must come back from the satellite exactly on the VFO A line. The Pluto crystal is a few kHz off at 2.4 GHz and drifts as it warms up: the program corrects it with the TX correction (⚙ Settings → Frequency), which holds for the whole transponder. Align the receiver first with the beacon lock, then the transmitter.
- TX/RX sync (the quickest): transmit (Carrier or a CW message), press TX/RX sync (it turns into «Click your echo…») and click your echo on the waterfall. The click does not tune: it measures how far the echo is from the line and moves the correction by the same amount. The status bar says «TX synced on your echo: … Hz». From then on you can change frequency and stay aligned. A click more than 20 kHz from the line is ignored.
- Calibrate TX: the same thing automatically, with «VVV VVV VVV» (see above).
- Track my echo (on by default): after every CW message, from the macros or the paddle, the program measures where your echo came back and corrects by itself, at most 150 Hz at a time. It recognises your echo by the rhythm of your keying, not by how strong it is: a stronger station nearby does not fool it. This way it follows the Pluto as it warms up.
- XIT (fine trim, your call): the −10 −1 XIT +1 +10 buttons in the TX bar move your transmission by a few Hz; 0 resets it; mouse wheel on the value 1 Hz (Shift 10 Hz). It applies at once, even while transmitting: in full duplex you put your echo exactly on the station. XIT stays when you change frequency and is not touched by Sync, Calibrate or Track my echo: it is your «a hair higher» the other station must not notice.
- The TX correction can also be typed by hand (in Hz); Reset correction sets it back to 0.
Transmitting RTTY on QO-100 (Pluto)
Since 2.8 the program transmits RTTY by itself: no MMTTY, no virtual audio cable. Choose RTTY mode and switch ⏻ TX on: the TX bar has the RTTY macros and the text box.
- Amateur RTTY: 45.45 baud, 170 Hz shift, Baudot with automatic letters/figures shift, 1.5 stop bits, continuous phase and smoothed mark/space transitions (500 Hz from the mark the signal is already 60 dB down: no splatter).
- Frequency: the mark lands exactly on VFO A (VFO B with SPLIT), space 170 Hz below, as in FSK. TX correction and XIT apply.
- F1–F6 send the macros; type text in the box and press Enter. You can type while it transmits: the text is queued and the transmission goes on without gaps. The text going out is shown in the TX bar.
- Automatic PTT: about one second of «diddle» (LTRS) before the text so the other station can lock, two LTRS at the end, then back to receive by itself. ■ STOP or Esc stop at once.
- The RTTY macros are a separate set from the CW ones (edit them in the same window while in RTTY). Defaults:
CQ CQ CQ DE {CALL} {CALL} {CALL} PSE K,{DX} DE {CALL} {CALL} K,{DX} TU 599 599 {CALL},{DX} TU 73 DE {CALL} SK,QRZ? DE {CALL},{DX} RR TU 73. Macros start and end on a new line by themselves. - Grabbing the callsign of whoever answers: click its call in the RX line → it goes into the His call box and from there into
{DX}. - In Full duplex the RX line shows your own echo decoded: you can check that the signal goes out right.
- For QSOs keep the RTTY skimmer off: it decodes VFO A only and leaves the CPU free.
Paddle on a COM port
You can key with your own paddle (or a straight key) wired to the PC through a USB-serial adapter: the program reads the two contacts, does the iambic keying and keys the Pluto. A HaliKey Serial works too.

- Wiring: dit (jack tip) to CTS, dah (ring) to DSR or DCD. With a USB-serial cable with DB9 (RS-232): dit to pin 8, dah to pin 6, common to pin 4 (DTR) through a 1 kΩ series resistor; the common does not go to ground. With an FT232RL TTL board the common goes to GND. Cheap 6-pin boards only have CTS: you need one with DSR.
- In ⚙ Settings → Frequency, Paddle (COM port) box: choose the Port and the Mode: Iambic B (squeezing then releasing adds one element), Iambic A (stops at once) or Straight key. Speed in WPM, the same as the macros. If dit and dah are swapped: Swap paddle.
- Sidetone: the monitor tone is made by the page, with no delay (the satellite echo comes back after 0.27 s: keying while listening to that is impossible). Pitch and volume are adjustable. The browser starts audio only after the first click on the page.
- With ⏻ TX on the paddle transmits on the VFO A uplink, with the same checks as the macros (transponder and beacons); what you send shows decoded in the TX bar. With TX off, or with another receiver, only the sidetone sounds: you can practise.
- The paddle has priority: touching the levers while a macro is running stops the macro; while you are keying macros do not start. After the last element the TX oscillator stays on for 0.8 s, for the gaps between letters and words, then switches off.
- If you unplug the adapter the program says so and tries to reopen the port every 10 s.
- First test: TX off, sidetone only. If dits and dahs come out right, the cable is good.
FM and AM
- The Receiver modes include FM (narrow band: repeaters, simplex, PMR, marine, satellites) and AM (airband, 10 m). They work with every receiver, HF too (FM on 10 m).
- VFO A and VFO B, SPLIT, mute, volumes, NB and NR work as in SSB: e.g. VFO A on the repeater output and VFO B on its input.
- Filter from 6 to 25 kHz (FM 12 kHz for 12.5 kHz channels, 16 or 25 kHz for wide ones; AM 8 kHz).
- SQL (squelch): mutes the audio when the channel holds only noise; 0 = always open, further right = a stronger signal is needed (double click = 0). The SQ lamp next to VFO A and VFO B lights up when the channel is open.
- Channel Step: 5, 6.25, 8.33 (airband), 12.5 and 25 kHz, for VFO A and VFO B.
- Above 30 MHz the S-meter uses the VHF scale (S9 = −93 dBm).
🛰️ QO-100 with the Pluto: from the LNB to the QSO
The whole path, in the right order: the station, the first setup (once only), what to do at every start, and how to keep TX and RX aligned through the day. The details of each control are in the QO-100 chapters above.
1 · The station
- Receive: dish with an LNB (9750 MHz oscillator). The 10489.5–10490 MHz downlink comes out at 739.5–740 MHz and goes to the Pluto RX input. The LNB needs power on the coax (bias-T, 12–18 V). An LNB with an external reference (PLL, GPSDO) is a few Hz off; a common one tens of kHz, and it drifts with temperature: the program corrects both.
- Transmit: Pluto TX output (2400 MHz, a few mW) → filter → amplifier → S-band feed. The filter is needed: the Pluto alone has harmonics and spurs.
- The Pluto crystal is a few ppm off (a few kHz at 2.4 GHz) and drifts as it warms up. A Pluto with a TCXO or external reference is much more stable, but the program corrects it anyway (Calibrate TX, Track my echo).
- Connection to the PC: USB (Analog Devices «PlutoSDR» driver, address
192.168.2.1) or network (type its address). Over the network reception is smoother.
2 · First setup (once only)
- At the bottom choose ADALM-Pluto as receiver and type its address. Sample rate 192 kHz (the Pluto runs at 2.304 MS/s and the program decimates); on a slow PC 96 kHz.
- ⚙ Settings → Frequency → 🛰 QO-100 → Guided setup → 1 · Receive → Set up: sets the QO-100 converter (LNB 9750 MHz) and goes to the CW slice with the beacons in view.
- 2 · Correct the LNB → Find the beacons: finds the three beacons (10489.500 CW, 10489.750 PSK, 10490.000 CW) across the Pluto’s whole 2.3 MHz and measures the LNB error, even hundreds of kHz. Correct and lock: from here the frequencies on the waterfall are the real ones and the beacon lock follows the drift. At the bottom «🔒 10489.500 · +0 Hz» appears.
- Streaming test (⚙ Settings → Frequency): it must say OK. It is needed for SSB and RTTY, where the Pluto receives and transmits together. If it fails: network instead of USB, or a lower sample rate.
- Pick the Microphone and set the gain (SSB), set up the CW and RTTY macros with your callsign (
{CALL}is the RBN one, in ⚙ Settings). - Low PWR (−30 dB) to start. ⏻ TX, then Carrier (5 s): your signal must show on the downlink after about 0.27 s. Raise PWR until you are below the beacon, never above. If the carrier shows up nowhere, try Swap I/Q.
- 3 · Align the TX → Free spot → Calibrate TX: sends «VVV VVV VVV», recognises your echo and corrects the uplink (TX correction). The result is saved.
3 · At every start
- Start FZR SDR and wait for 🔒 next to the beacon: the LNB is locked. If after a minute there is ⚠, repeat step 2 (Find the beacons).
- Let the Pluto warm up 10–15 minutes (even just receiving, with ⏻ TX on): its crystal moves mostly at the start.
- Go to a free spot in the CW slice and press Calibrate TX. From here you transmit where the VFO A line is (VFO B with SPLIT).
- Keep Track my echo on: after every CW message it corrects the small Pluto drifts by itself.
4 · Through the day: keeping the TX aligned
- Quick check, with Full duplex on: send a message (in CW «VVV» or your macro) and watch your echo on the waterfall. It must sit on the VFO A line. In RTTY check that the RX line decodes your text; in SSB listen to yourself.
- About every hour, or when the temperature changes a lot (sun on the Pluto, room warming up), or if the echo is more than 20–30 Hz off: Calibrate TX on a free spot. It takes a few seconds.
- In SSB and RTTY Track my echo does not work (it needs the CW keying rhythm): now and then a Calibrate TX, or TX/RX sync clicking your echo.
- Fine trim: if the other station says you are a hair off, use XIT (±1 Hz). XIT stays when you change frequency and is not touched by the calibrations.
- To work a station: in CW click its trace (VFO A goes onto the carrier, to the Hz), in SSB and RTTY tune VFO A onto it; then click its callsign in the RX line to put it in His call and use the macros with
{DX}. - If the beacon lock shows ⚠ (beacon lost, LNB jumping), the program runs the three-beacon search again by itself; if that is not enough, repeat step 2.
| What | When | Control |
|---|---|---|
| LNB (receive) | the first time, or if the lock cannot find the beacon | 3 steps → Find the beacons → Correct and lock |
| LNB drift | always, by itself | Beacon lock 🔒 |
| Pluto crystal (transmit) | at every start after 10–15 min, then about every hour | Calibrate TX (free spot) |
| Small drifts in CW | after every message, by itself | Track my echo |
| Trim by ear | when needed | XIT ±1 / ±10 Hz |
📒 Memory bank
The 📒 Memories button (next to «Save memory», K key) opens the memory bank: frequencies with a name, mode and group, for every receiver and every mode (HF too: a DX, a net, a contest frequency).
- Click a memory: FZR SDR goes to that frequency, in its mode, with its filter (and squelch in FM/AM); the centre always moves, with the memory one fifth of the band below the centre (38 kHz at 192 kHz), away from the centre spike and with room above for split. The panel stays open, so you can hop from one memory to the next.
- + Save here: saves the VFO A frequency with the current mode and settings; type the name and group (existing groups are offered in the list).
- ✎ edits name, group, frequency and mode; 🗑 deletes (second click to confirm).
- Search by name or frequency, and filter by group.
- On first use the bank already holds 354 memories, by group: amateur 10 m, 6 m, 2 m, 70 cm and 23 cm (CW, SSB, FM and FT8 calling, APRS, ISS voice, APRS and repeater), 2 m repeaters R0–R7 and R0x–R7x (output), 70 cm repeaters on the three grids used in Italy (output 430.0125–430.400 and 431.2125–431.600 with +1.6 MHz shift, 430.500–431.100 with +5 MHz, 438.650–439.425 IARU with −7.6 MHz), PMR446 1–16, LPD 1–69, airband (121.5 emergency, 123.45 air-to-air, 243.0 military emergency), North-West airports (Malpensa, Linate, Milano Radar and Milano Information, Caselle, Aosta AFIS, 123.1 SAR: ATIS, TWR, GND and APP; airport frequencies change now and then, fix them with ✎), marine (channels 16, 6, 9, 13, 70 DSC and AIS), QO-100 (beacons, CW slice, FT8, phone: with the converter). Preset restores the ones you deleted; updating the program adds new ones by itself, your memories are left alone. Shortwave (since 2.9.6): NCDXF/IARU beacons, FT8 from 160 to 10 m, IARU emergency frequencies, QRP CW and SSB, SSTV, time signals (DCF77, CHU, RWM, WWV), Shannon VOLMET; in QO-100 also the 10489.860 emergency frequency.
- If a memory is out of reach of the receiver in use (e.g. 145.5 MHz with the Perseus) the program says so and stays put.
- Memories are kept in
fzrsdr.jsonwith the other settings.
Importing repeaters (IK2ANE) and CHIRP channels
In the memory bank the 📥 Import repeaters… button opens a list from the PC.
- IK2ANE repeater list (Italy and neighbouring countries): download
pontixls.xlsfrom ik2ane.it («DOWNLOAD PONTI.xls») and pick it. Import by region and province (ticking a region takes all its provinces) or within N km of your locator, only the bands you want (2 m and 70 cm by default) and, optionally, digital-only repeaters too (DMR, C4FM, D-STAR: not decoded here, kept as reminders). The preview shows how many repeaters and in which groups. - Each repeater becomes an FM memory on its output frequency, in the group Ponti <province> (e.g. «Ponti BI»), with name, callsign and place; below, small: shift, CTCSS tone, system, locator and keeper, i.e. what you need to transmit with the radio.
- Importing the updated file again refreshes the repeaters of the chosen groups; your memories are left alone. The list is © Walter De Vercelli IK2ANE, free for private amateur use crediting the author.
- CHIRP CSV: the channels programmed in your handhelds (FM, AM, SSB, CW) go into a group named after the file.
- The 🗑 next to a group name deletes the whole group (second click to confirm).
🔤 Callsigns and decoding
The decoder follows each CW signal on its exact frequency, measures the speed by itself and ignores short noise bursts. To make callsigns more reliable it uses three aids, in this order:
- Reverse Beacon Network: if the decoded callsign matches one spotted nearby, it is sure.
- Repetition: callers repeat their call. When the same callsign is decoded twice on the same signal it becomes confirmed, and garbled readings of that signal (a wrong letter, a lost beginning) are shown corrected with ?, even the earlier ones.
- Callsign file: if the folder contains
MASTER.SCP(Super Check Partial, from supercheckpartial.com or the N1MM folder),MASTER.DTA(CW Skimmer) orcallsign.dat/nominativi.txtwith one call per line, known calls are highlighted and those one letter off are suggested with ?.
Words glued together by a too-short space (CQCQDE, DL1ABCTEST, TU5NN203) are split automatically.
📡 Reverse Beacon Network
- RBN button (next to List) or the RBN box in ⚙ Settings → Network and radio: connects to and disconnects from telnet.reversebeacon.net, CW only. Your registration callsign is used; if you are not registered a Callsign field appears.
- Spot button: shows or hides the labels on the waterfall. Spots appear in purple on the left edge, at their frequency, with dB; they fade with time and disappear after 15 minutes.
- The RBN spots stations calling CQ: the DX and contest stations, hardly ever the callers in a pile-up.
⏺️ Recording and playback
In the Audio box of the radio panel (compact in the Skimmer modes: 💾 m:ss and ● REC):
- 💾 Save last m:ss: FZR SDR always keeps the last minutes received in memory; the button writes them to disk without stopping the receiver. Handy to check calmly whether the DX put you in the log. How many minutes is chosen at the bottom under Memory (off, 1, 2, 5, 10 minutes; at 96 kHz about 23 MB of RAM per minute).
- ⏺ Record: records to disk from now until pressed again (about 35 MB per minute at 96 kHz). Changing band closes the file and starts a new one.
- 📂: opens the
registrazioni(recordings) folder.
Files are 24-bit IQ WAVs with centre and DX written inside and in the name (e.g. FZR_20261017_121500Z_18085.000kHz_DX18080.00.wav); HDSDR, SDR Console and CW Skimmer open them too.
To play back: Receiver → Recording (WAV). The Perseus stops and the playback bar appears: ▶/⏸ (also the space bar), −15 s, position slider, list of recordings and Browse… to open any IQ WAV. Waterfall, decoding and listening search work as live. CW Skimmer recordings do not store the frequency: type it in Centre kHz and it is remembered for that file. Back to receiver restarts the Perseus.
↑ Back to top⌨️ Mouse and keyboard
| Command | Effect |
|---|---|
| Wheel / drag | scrolls the waterfall (audio stays on the DX) |
| Ctrl + click | DX exactly there (10 Hz step) |
| Ctrl + wheel | moves the DX by 50 Hz (with Shift 10 Hz) |
| Right click (or long press on a tablet) | menu: Set DX here, Marker here / Remove this marker, Remove all markers, Centre view here |
| PgUp / PgDn | ±5 kHz |
| Up / down arrows | scroll the view |
| Left / right arrows | move the DX by 50 Hz (with Shift 10 Hz) |
| Home | back to the DX |
| S | SPLIT on / off (Receiver modes) |
| B / N | NB / NR: next level |
| K | opens / closes the memory bank |
| Space bar | pause / resume in playback |
| Double click on Brightness or Contrast | default value |
📱 Use from a tablet
FZR SDR can also be watched from a tablet or phone on the home network: open in the browser the address written in fzrsdr.log, like http://192.168.x.x:8073. Closing the tablet browser does not stop anything: to switch off use Quit. Closing the window on the PC, instead, switches everything off.
❓ Troubleshooting
🔴 The receiver does not start
Close CW Skimmer, HDSDR and the Perseus software; press Restart receiver. Check in Task Manager that no other FZR SDR is running.
🔴 ExtIO: «No ExtIO plugin found» or «cannot load the plugin»
Install the receiver’s 32-bit HDSDR plugin and its driver, then Plugin → Browse…. Close HDSDR: only one program at a time can use the receiver.
🔴 Signals slightly off frequency (e.g. RBN spots do not line up)
Calibrate the receiver: Frequency calibration.
🔴 Stations mirrored around the centre
Tick Swap I/Q.
🔴 RTL dongle: in FM I see the carrier but hear nothing
The dongle is off frequency: Calibrate… on a repeater (see Calibration).
🔴 QO-100: stations are shifted (e.g. FT8 is not at 10489.540)
The LNB is not exactly 9750.000 MHz: tick Beacon lock with the beacon in view, or Calibrate… on 10489.5.
🔴 Slow waterfall and choppy audio (mostly in DXpedition and Contest)
The page draws at most 30 times a second and throttles itself; if it still stutters, check that graphics are accelerated in the Edge window: edge://gpu, «Canvas» must say «Hardware accelerated».
🔴 RTL dongle stutters
Look in fzrsdr.log at the line repeated every 3 s: «dati» below 192 k = the dongle or USB cannot keep up (try another USB port, no hub); «calcolo» near 100% = the PC cannot cope; «rtl_tcp in coda» = the program is falling behind.
🔴 No audio
Press Volume: the browser turns audio on only after a click.
🔴 Too many wrong decodes
Sensitivity Medium or Low; narrow the RX filter.
🔴 Waterfall too dark or too bright
Brightness and Contrast sliders, or another palette in Colours.
🔴 Task Manager shows two FZRSDR.exe
That is normal: the “single file” exe is made of two processes. On closing, both disappear within a few seconds.
🔴 “Persi” (lost) growing in the log
The PC cannot keep up: choose a lower sample rate (48 kHz).
🔴 In RTTY reception stutters
The RTTY skimmer over the whole band is too heavy (in the log «calcolo» above 90% and «coda» growing): switch RTTY skimmer off, you decode VFO A only.
🔴 I press an RTTY macro and nothing is sent
Check that ⏻ TX is on and the VFO is inside the transponder. The log has a «TX RTTY: richiesta …» line for every F1 or Enter, with the reason underneath if it did not start. If the macro contains {DX}, fill the His call box first.
🔴 The log says «FZR Skimmer 1.83»
You are starting the old exe. Delete FZRSkimmer.exe and the «FZR Skimmer» icon, then run the FZR SDR setup again.
🔴 My CW echo is a little below or above the station
First Calibrate TX, then trim with XIT (±1 Hz): it stays when you change frequency.
🔴 The paddle does nothing
In ⚙ Settings → Frequency, Paddle box, the port error is shown underneath. With the DB9 cable the common goes to DTR, not to ground; with the TTL board it goes to ground. Try with TX off: the sidetone must sound (click once on the page first).
🔴 Anything else
Look at fzrsdr.log in the program folder and send it to IW1FZR.
FZR SDR is a program by IW1FZR. The Perseus is a Microtelecom product; its files (perseususb.dll, .sbs) are not distributed with FZR SDR and must be taken from the manufacturer’s site.
↑ Back to top